How to Login and start trading Crypto at BitMEX
How to Login Account to BitMEX
How to Login your BitMEX account
1. Open the BitMEX website and click on [Login] in the top right corner.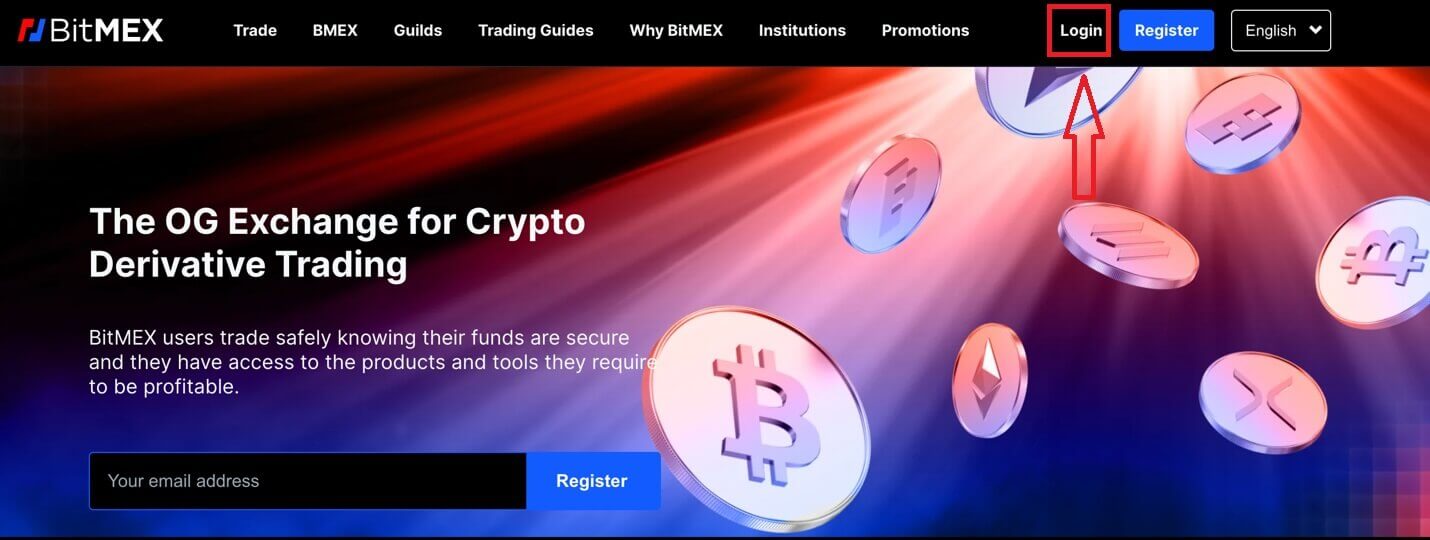
2. Fill out your email and password to log in.
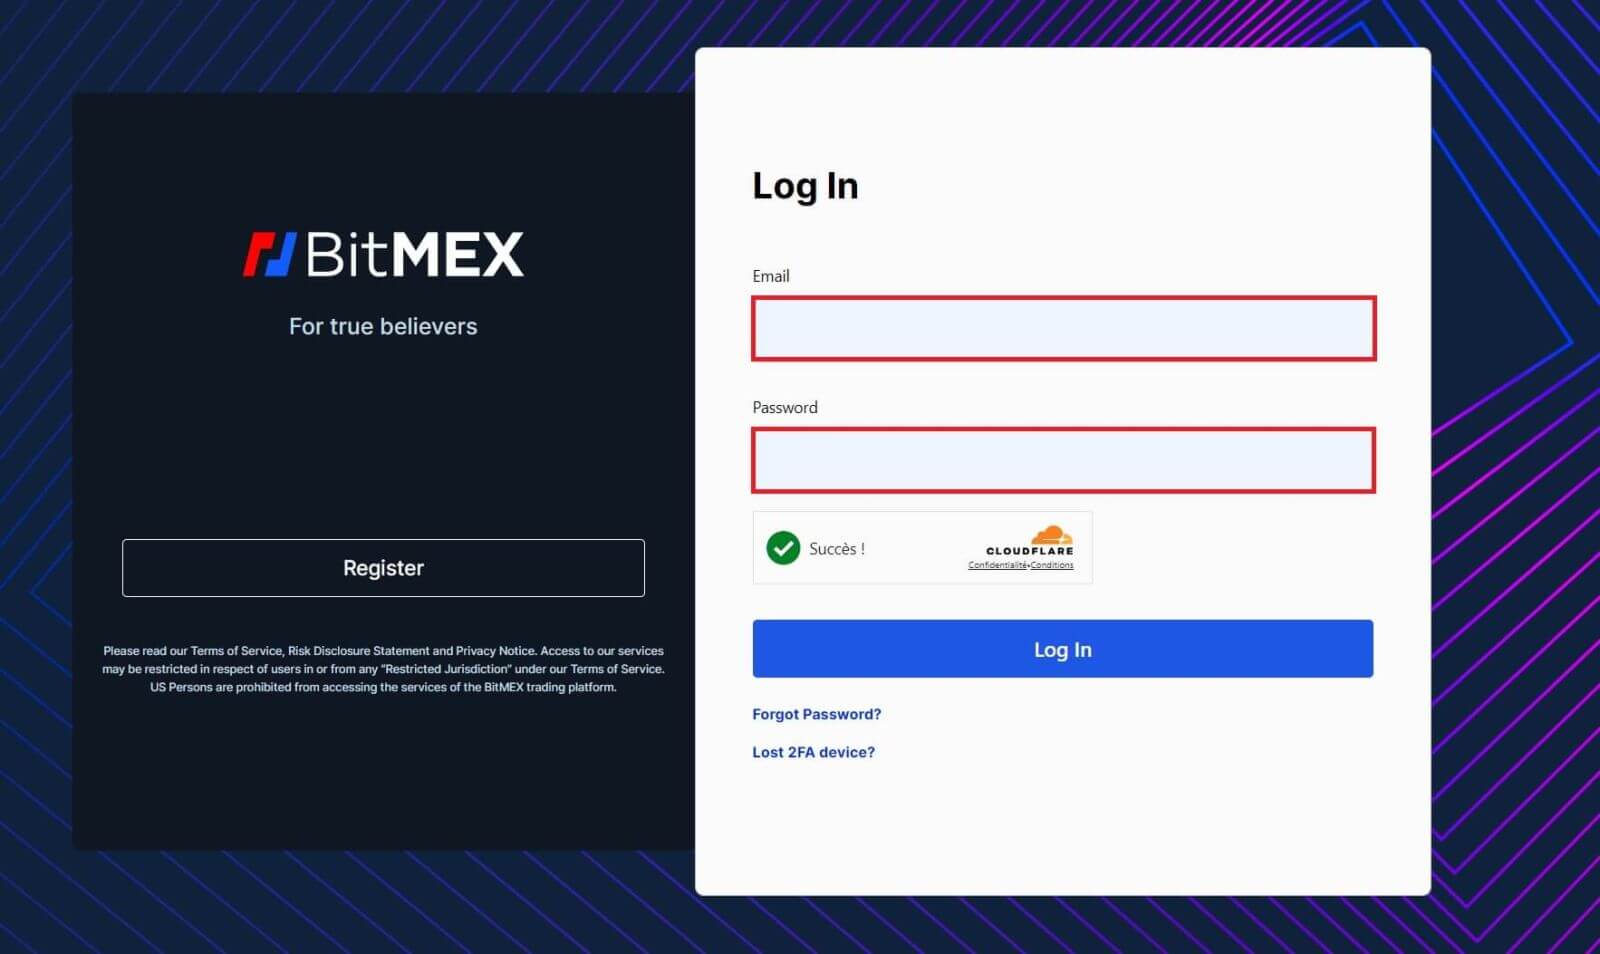
3. Click on [Log In] to log in to your account.
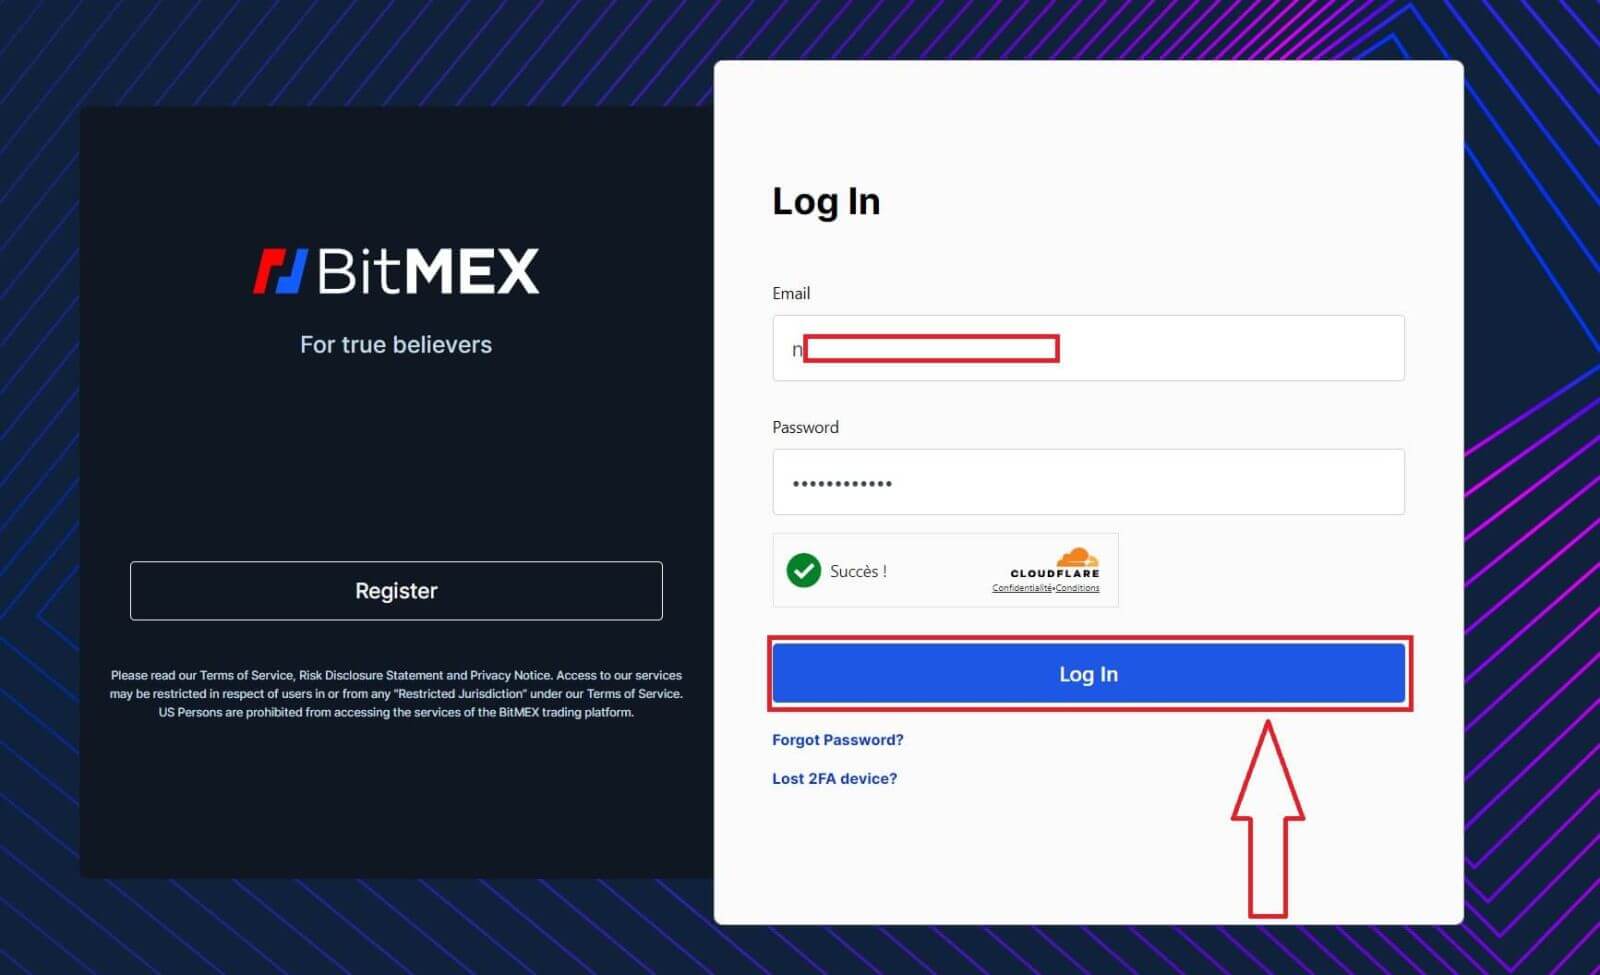
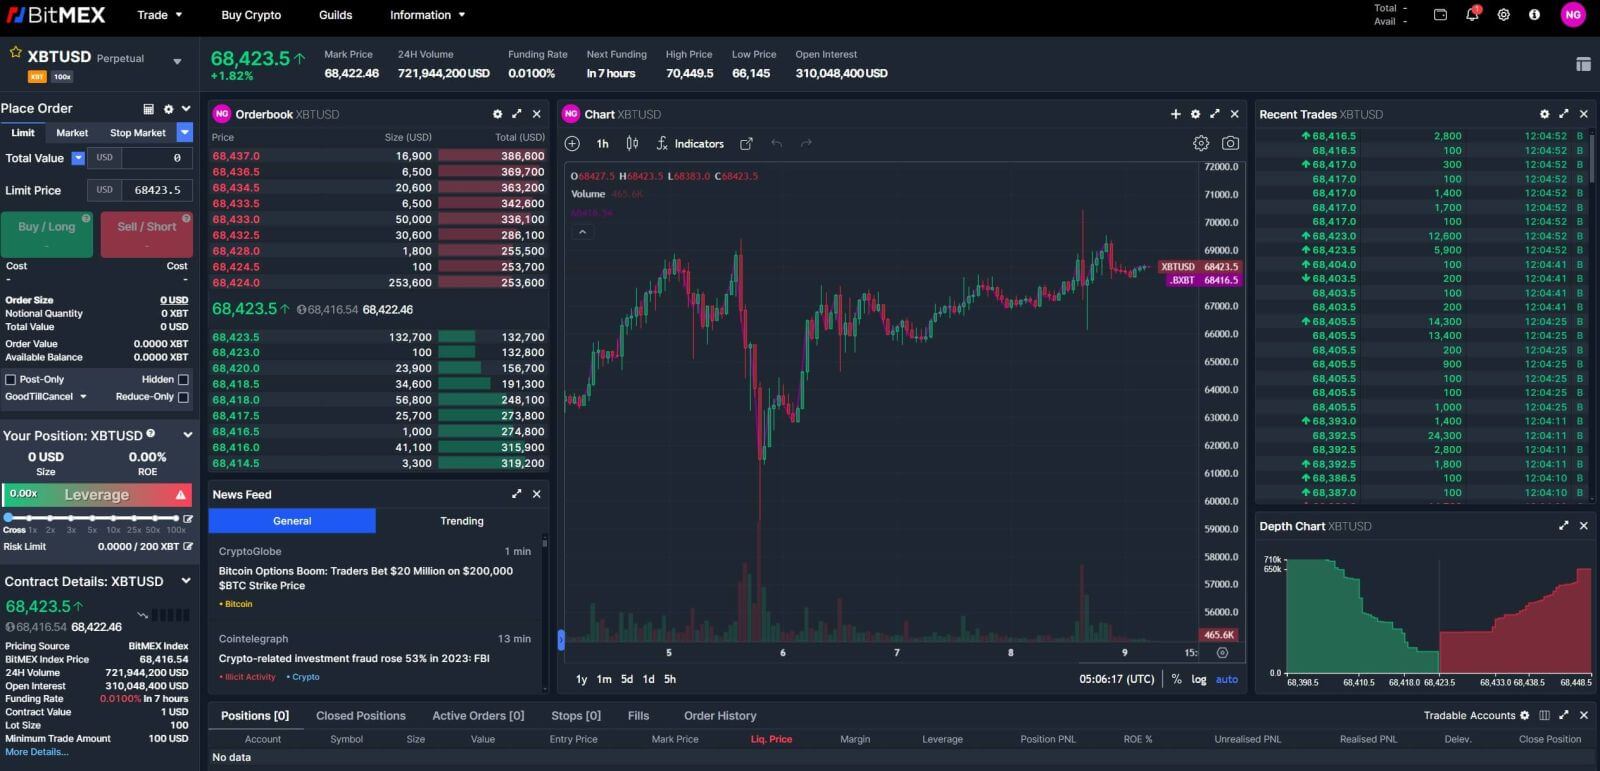
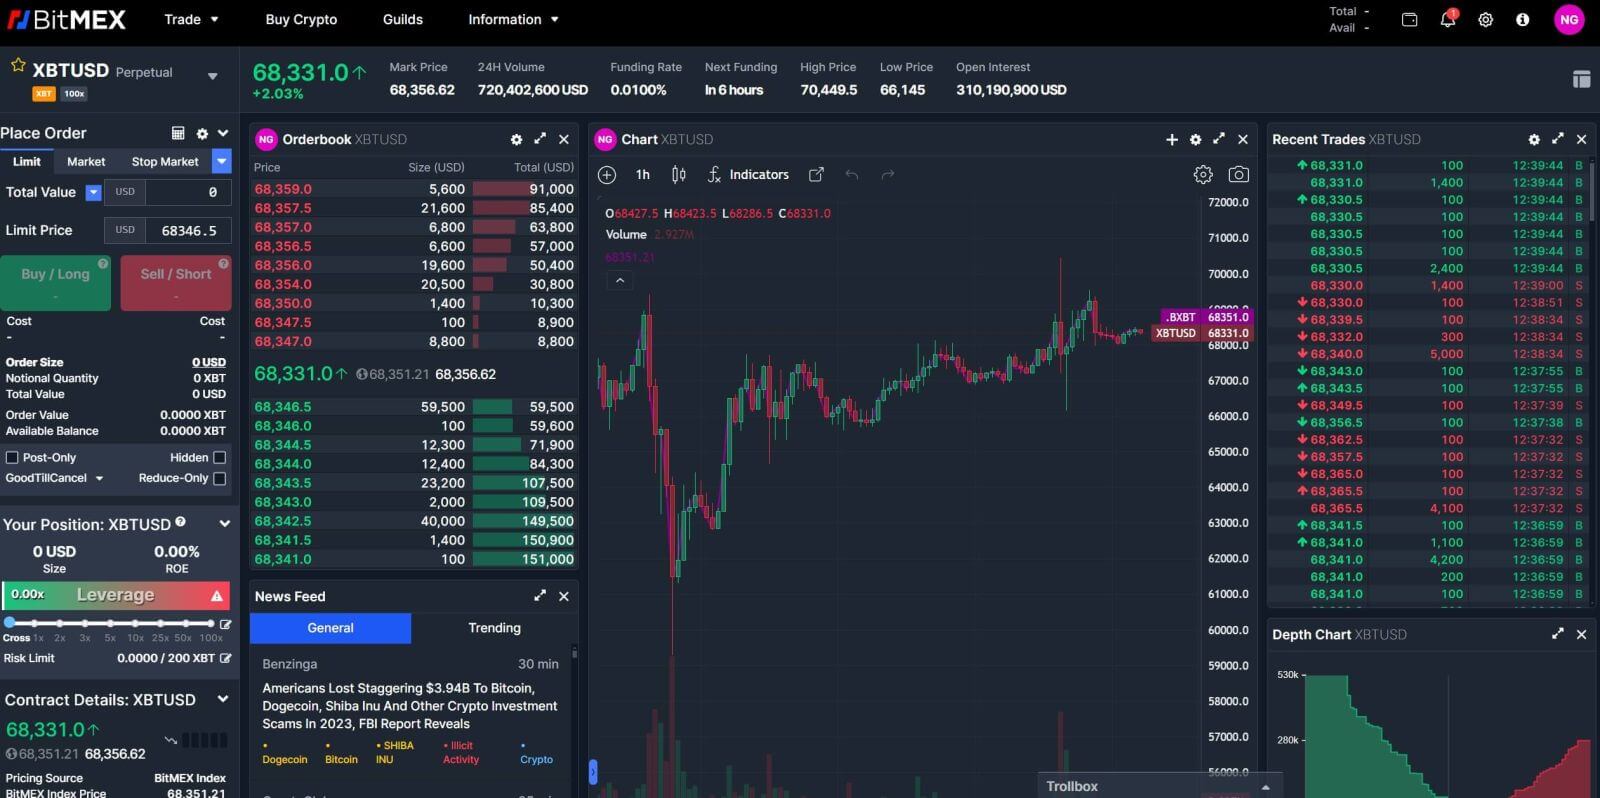
4. This is the home page of BitMEX when you log in successfully.
How to Login on the BitMEX app
1. Open your BitMEX app on your phone and click on [Login].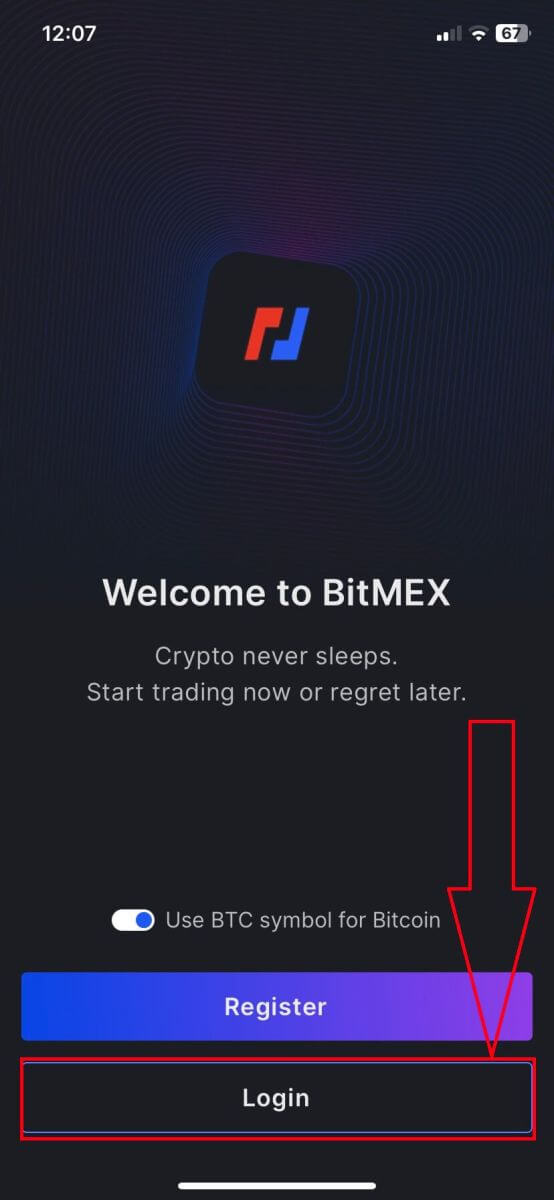
2. Fill out your email and password to log in, remember to tick on the box to verify that you are human.
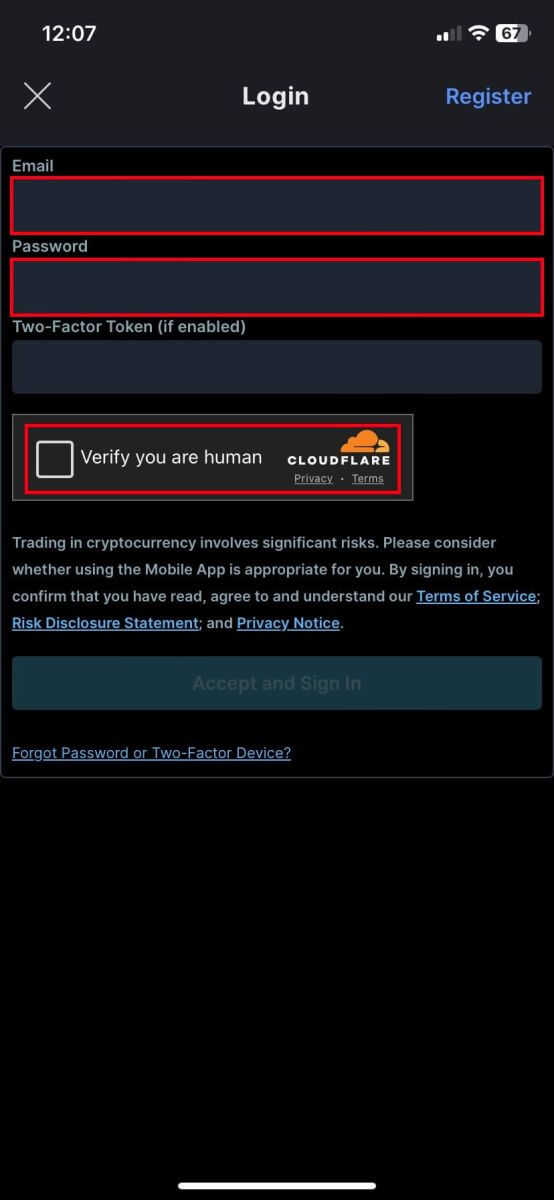
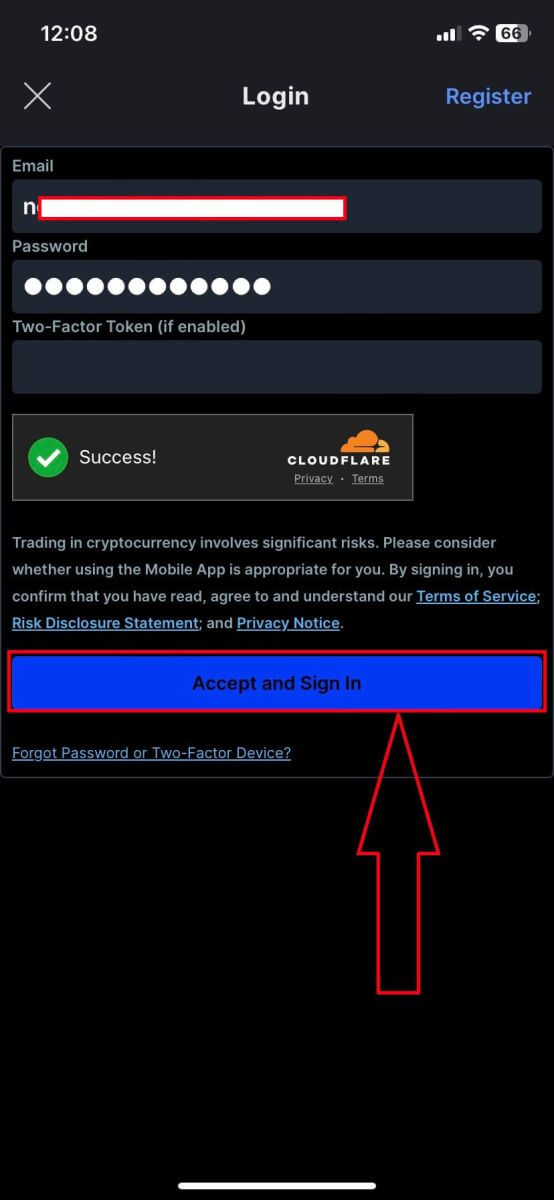
3. Click on [Accept and Sign In] to continue.
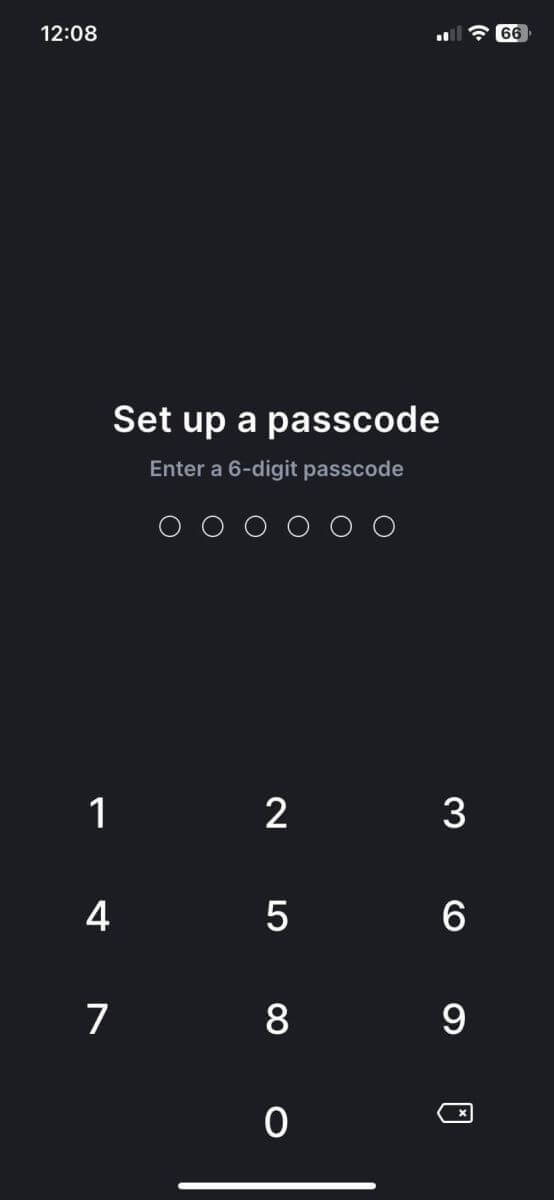
4. Set up your 2nd password to ensure the security.
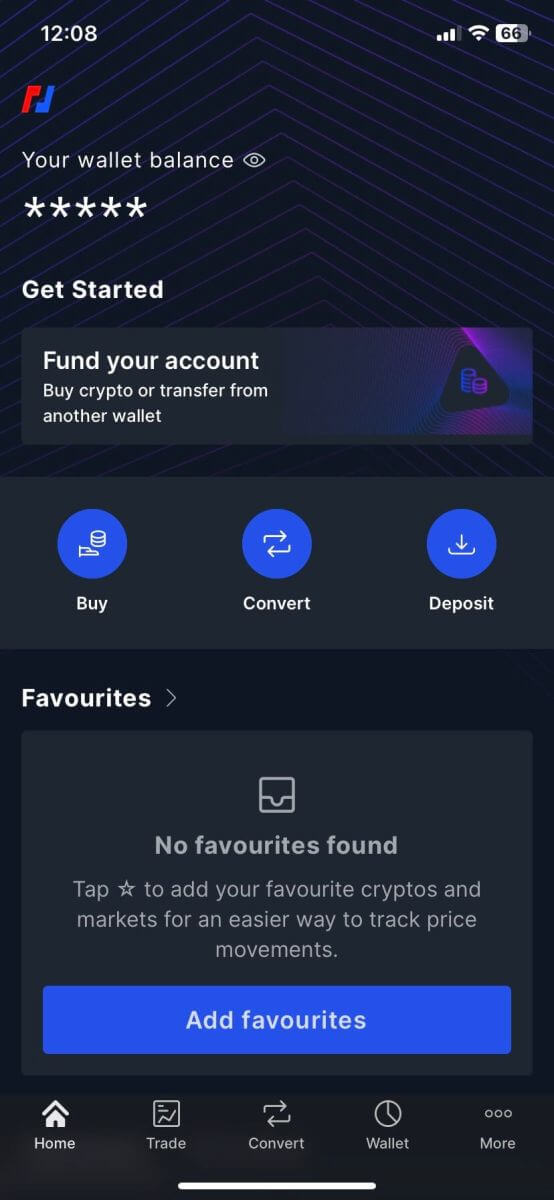
5. Here is the home page after you login successfully.
I forgot the password for the BitMEX account
1. Open the BitMEX website and click on [Login] in the top right corner.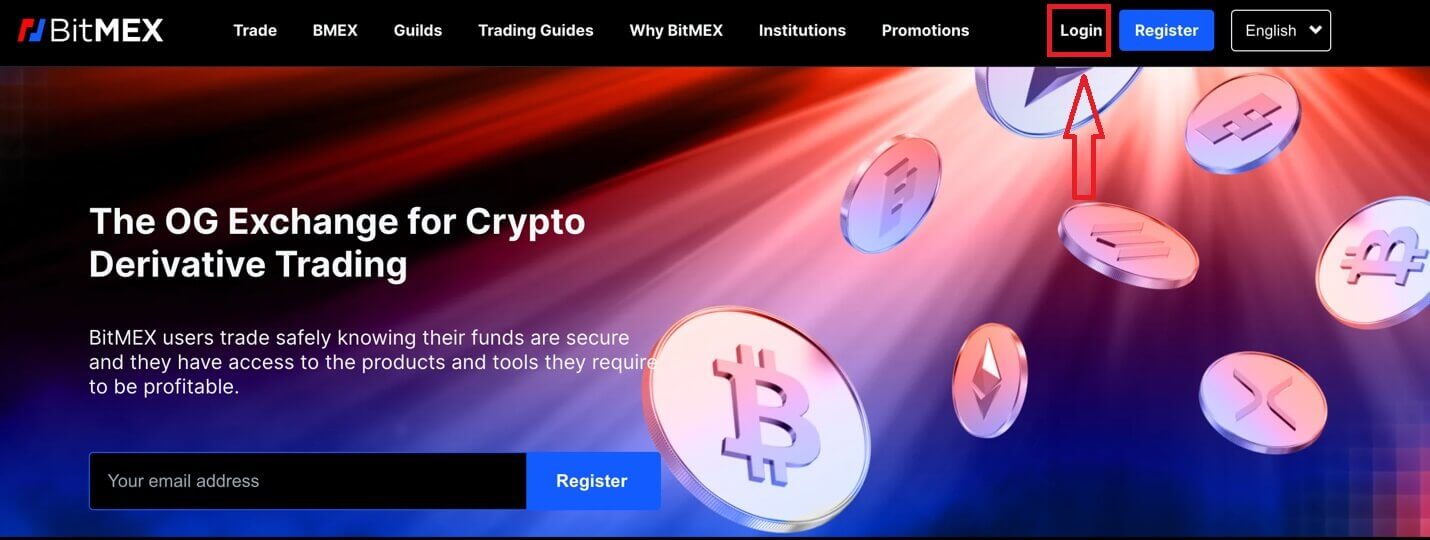
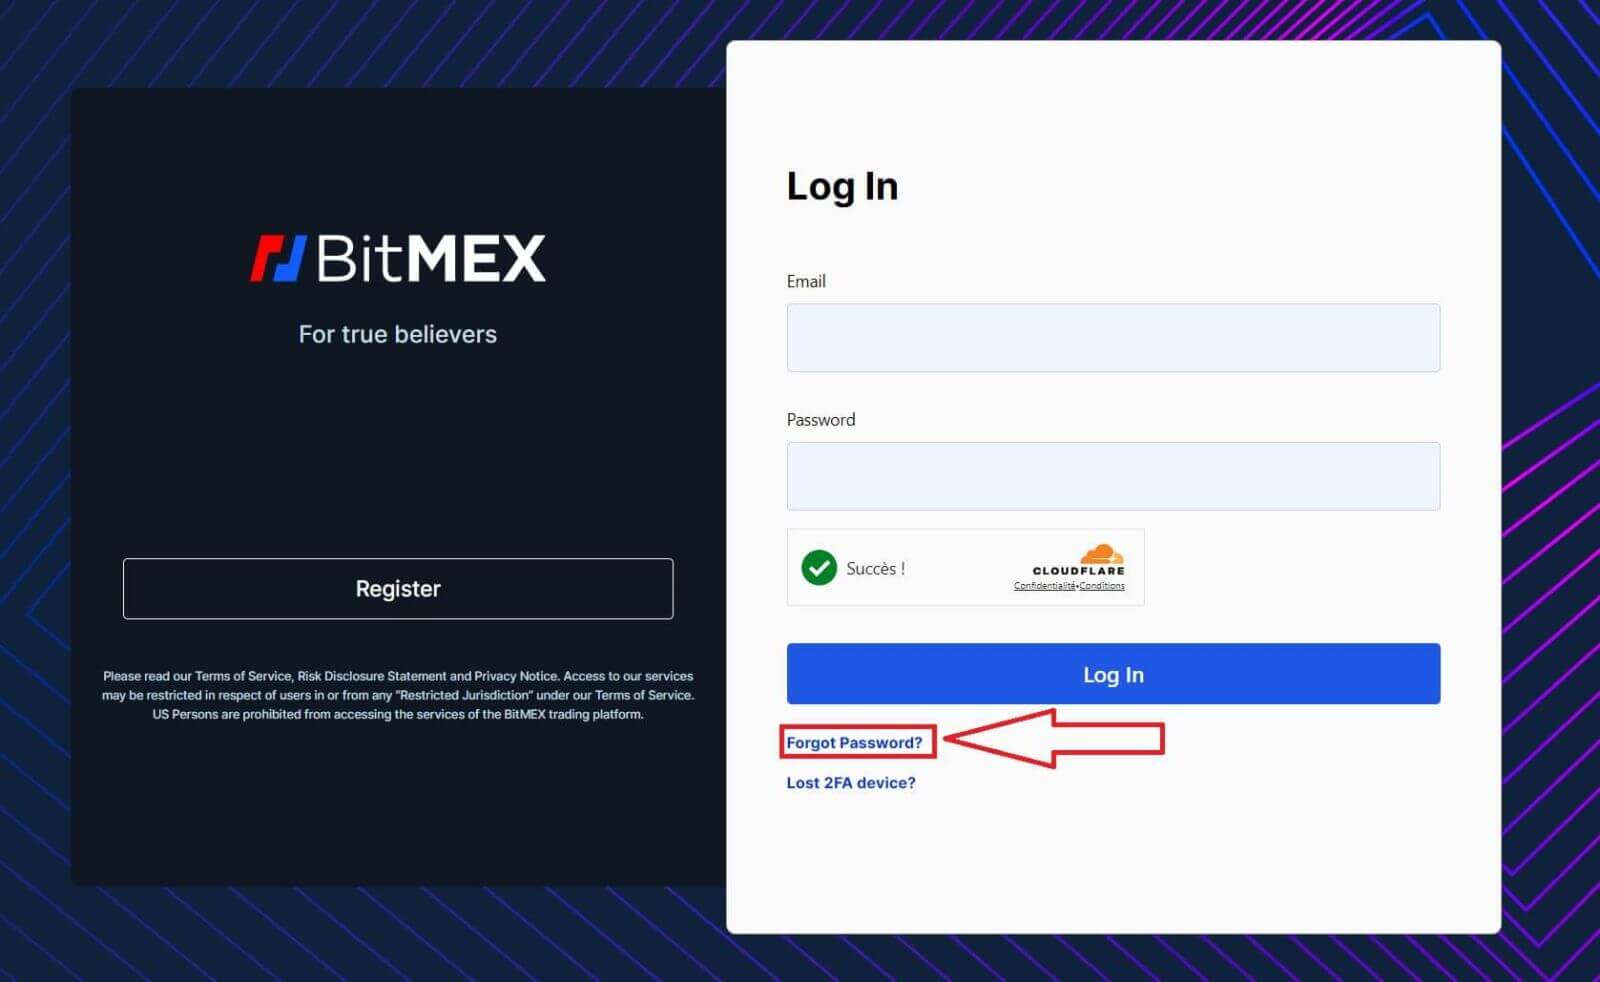
2. Click on [Forgot Password].
3. Fill out your email address.
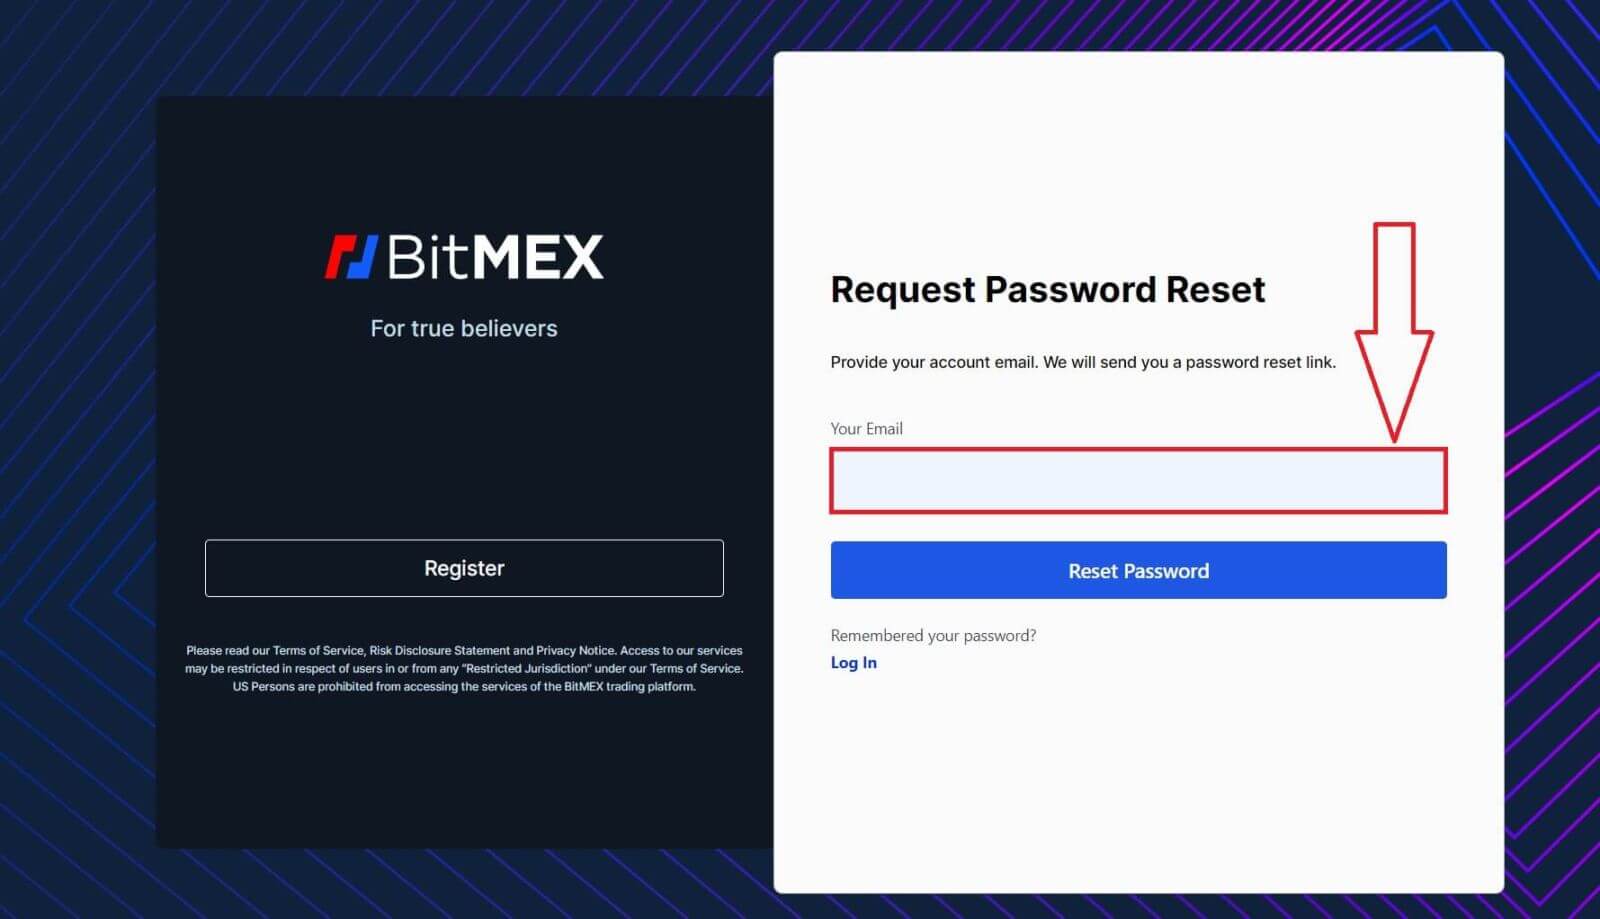
4. Click on [Reset Password] to continue.
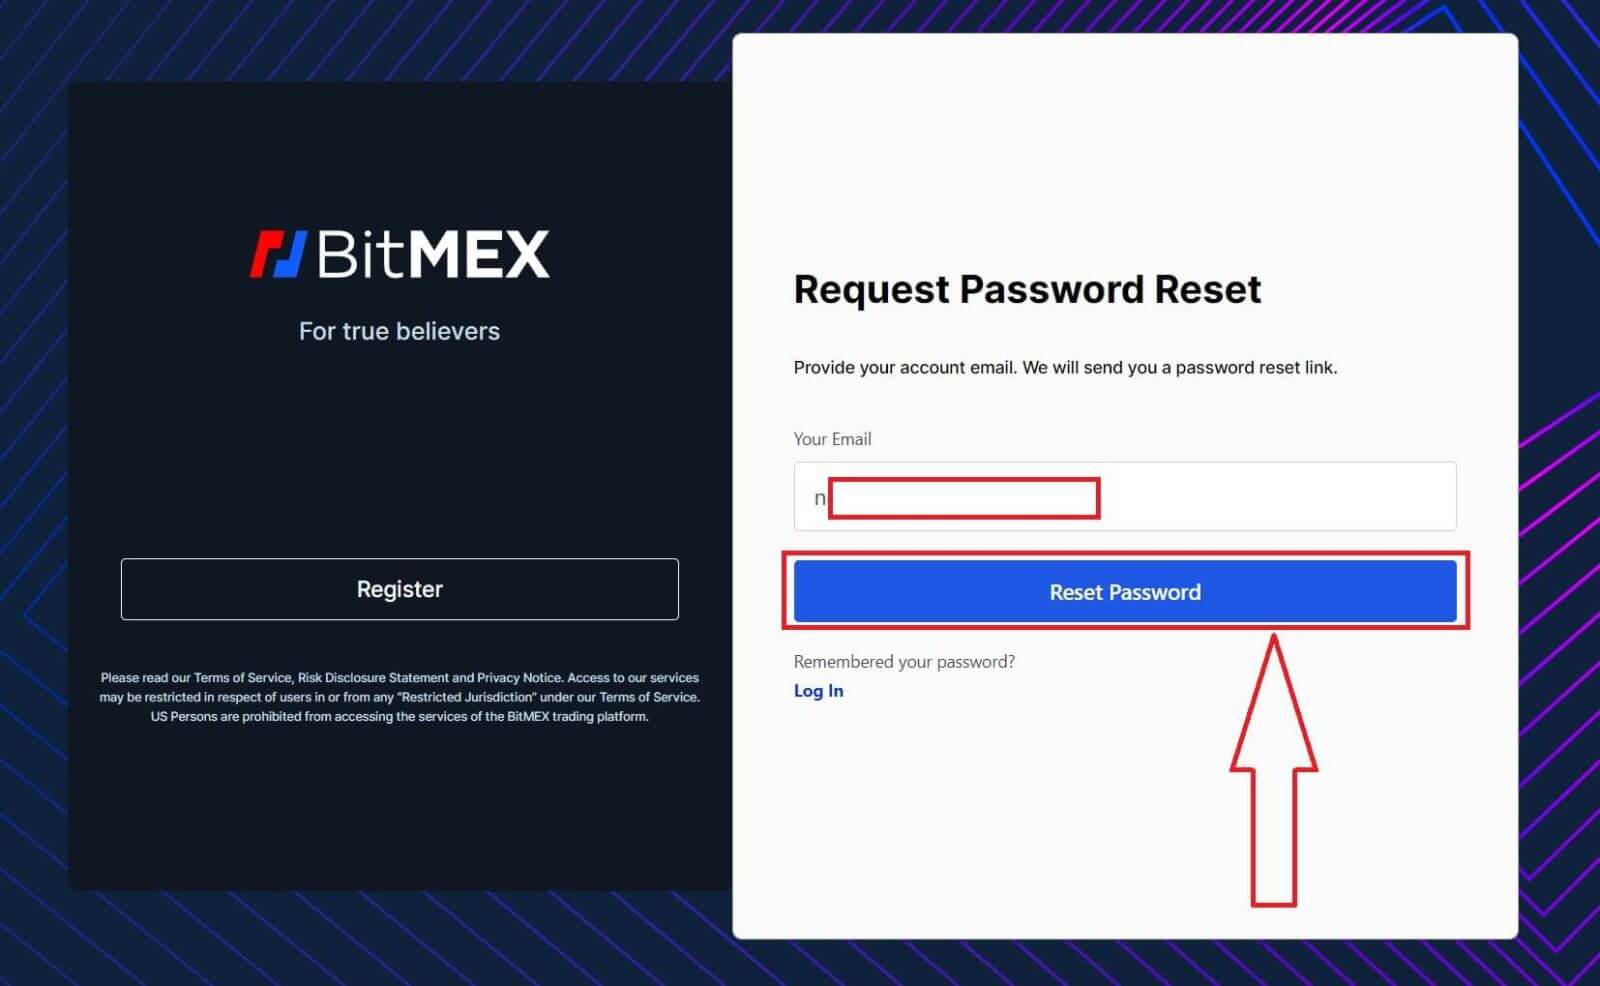
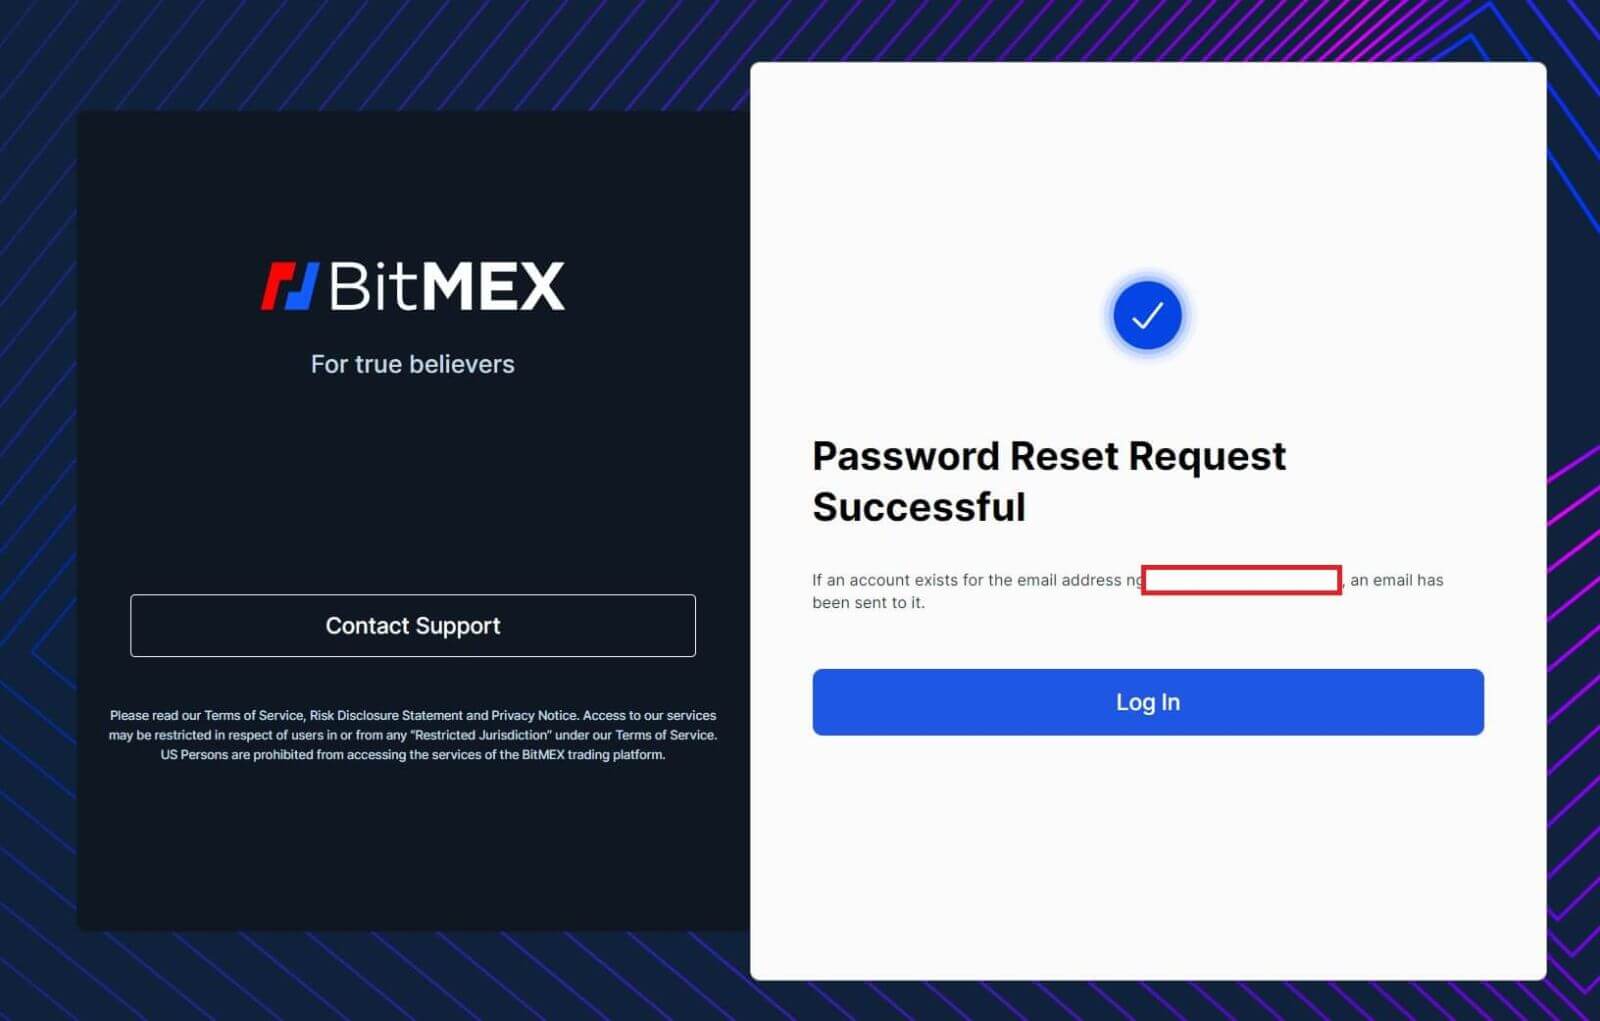
5. The password reset request is successful, open your mail box and check for the mail.
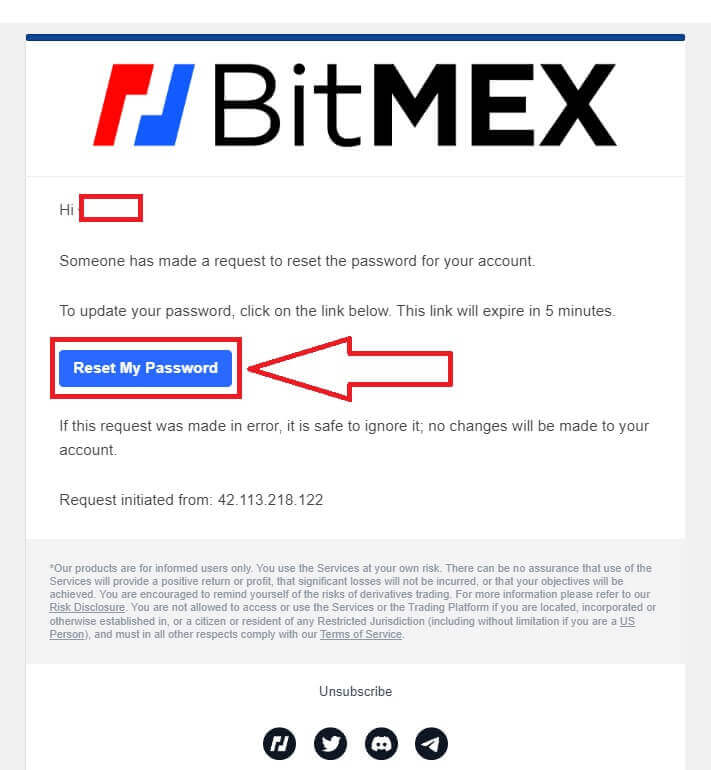
6. Click on [Reset My Password] to continue.
7. Type in the new password that you want.

8. Click on [Confirm New Password] to complete.

9. A pop-up window will come up to ask you to log in again. Fill out the email and the new password then click on [Log In] to complete.
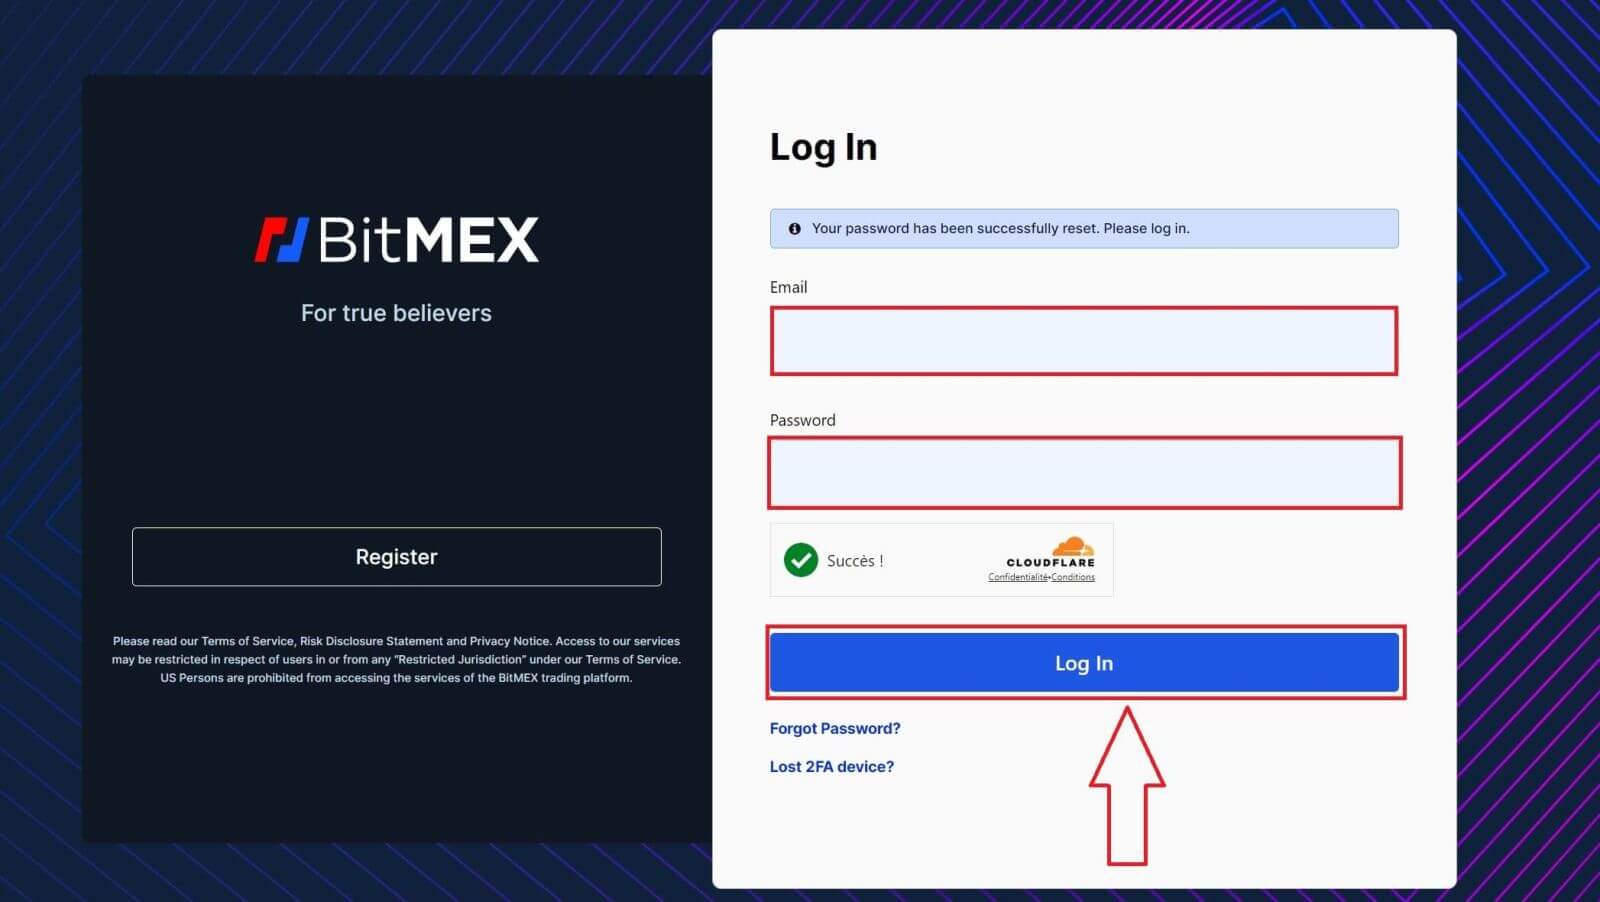
10. Congratulations, you reset your password successfully.
Frequently Asked Questions (FAQ)
What is a Two-factor token (2FA)?
Two-factor authentication (2FA) is an extra layer of security used to make sure that people trying to gain access to an online account are who they say they are. If you have 2FA enabled on your BitMEX account, you would only be able to log in if you’ve also entered the 2FA code generated by your 2FA device.
This prevents hackers with stolen passwords from logging into your account without additional verification from your phone or security device.
Is 2FA mandatory?
To enhance account security, 2FA has become mandatory for on-chain withdrawals as of 26 October 2021 at 04:00 UTC.
How do I enable 2FA?
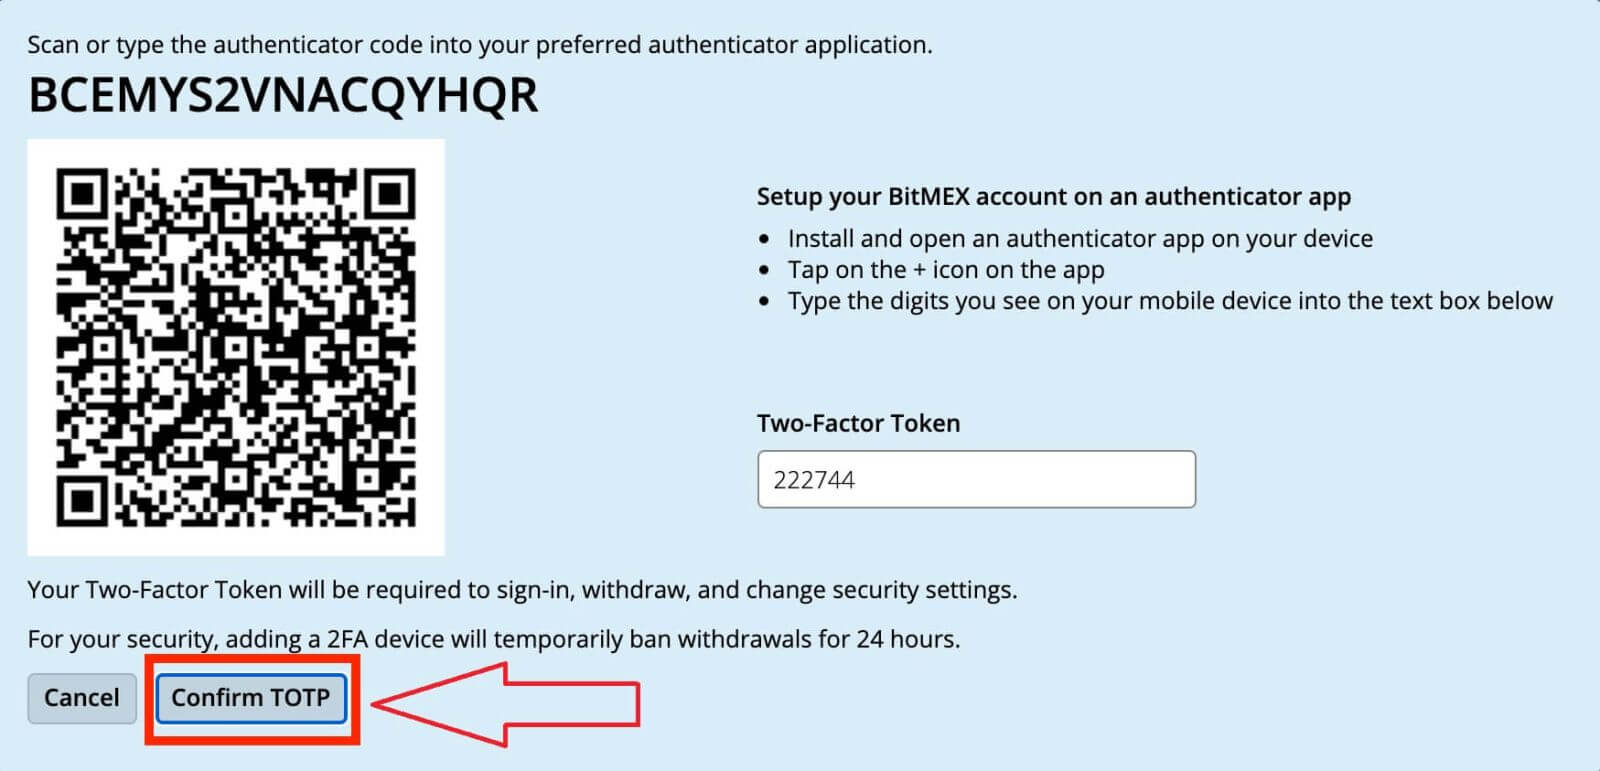
1. Go to the Security Centre.
2. Click the Add TOTP or Add Yubikey button.

3. Scan the QR code using your mobile device with your preferred authentication app
4. Enter the security token the app has generated into the Two-Factor Token field on BitMEX
5. Click the Confirm TOTP button
What happens once I enable 2FA?
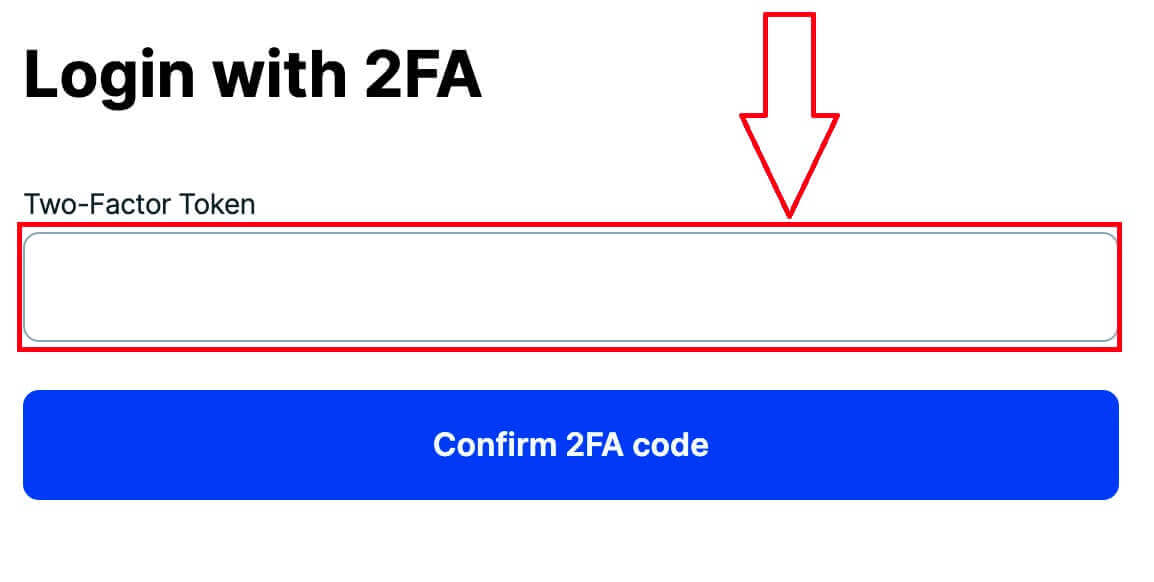
Once you’ve successfully confirmed it, 2FA will be added to your account. You will need to enter the 2FA code your device generates every time you wish to log in or withdraw from BitMEX.
What if I lost my 2FA?
Setting up 2FA again using Authenticator Code/QR code
If you keep a record of the Authenticator code or QR code that you see on the Security Centre when you click Add TOTP or Add Yubikey, you can use that to set it up again on your device. These codes are only visible when you set up your 2FA and will not be there after your 2FA is enabled already.
All you’ll need to do to set it up again is to scan the QR code or enter the Authenticator code into Google Authenticator or the Authy app. It will then generate the one-time passwords you can enter into the Two Factor token field on the login page.
Here are the exact steps you would need to take:
- Install and open an authenticator app on your device
- Add account (+ icon for Google Authenticator.Setting Add Account for Authy)
- Select Enter Setup Key or Enter Code Manually
Disabling 2FA through Reset Code
Once you have added 2FA to your account, you can get a Reset Code at the Security Centre. If you write it down and store it somewhere safe you’ll be able to use it to reset your 2FA.

Contacting Support to disable 2FA
As a last resort, if you don’t have your Authenticator or Reset code, you can contact Support, asking them to disable your 2FA. Through this method, you’ll need to complete an ID verification which can take up to 24 hours to get approved.
Why is my 2FA invalid?
The most common reason 2FA is invalid is because the date or time is not set up correctly on your device.
To fix this, for Google Authenticator on Android, please follow the steps below:
- Open the Google Authenticator app
- Go to Settings
- Click on Time correction for codes
- Click Sync Now
If you’re using iOS, please follow the steps below:
- Open your device’s Settings
- Go to General Date Time
- Turn on Set Automatically and allow your device to use its current location to determine the correct time zone
My time is correct but I’m still getting invalid 2FA:
If your time is set up correctly and it’s in sync with the device you’re trying to log in from, you could be getting invalid 2FA because you’re not entering the 2FA for the platform you’re trying to log into. For example, if you also have a Testnet account with 2FA and you’re accidentally trying to use that code to log in to the BitMEX mainnet, it will be an invalid 2FA code.
If that’s not the case, please have a look at What if I lose my 2FA? article to see what you can do to get it disabled.
Why should I enable 2FA on my account?
Securing your account with two-factor authentication (2FA) is one of the most important steps when opening any cryptocurrency trading account or wallet. 2FA makes it extremely difficult for bad actors to access your account, even if your email address and passwords are compromised.
How to start trading Crypto at BitMEX
What is Spot trading?
Spot trading refers to the buying and selling of tokens and coins at the current market price with immediate settlement. Trading spot is different from derivatives trading, as you need to own the underlying asset to place a buy or sell order.
How to Trade Spot on BitMEX (Web)
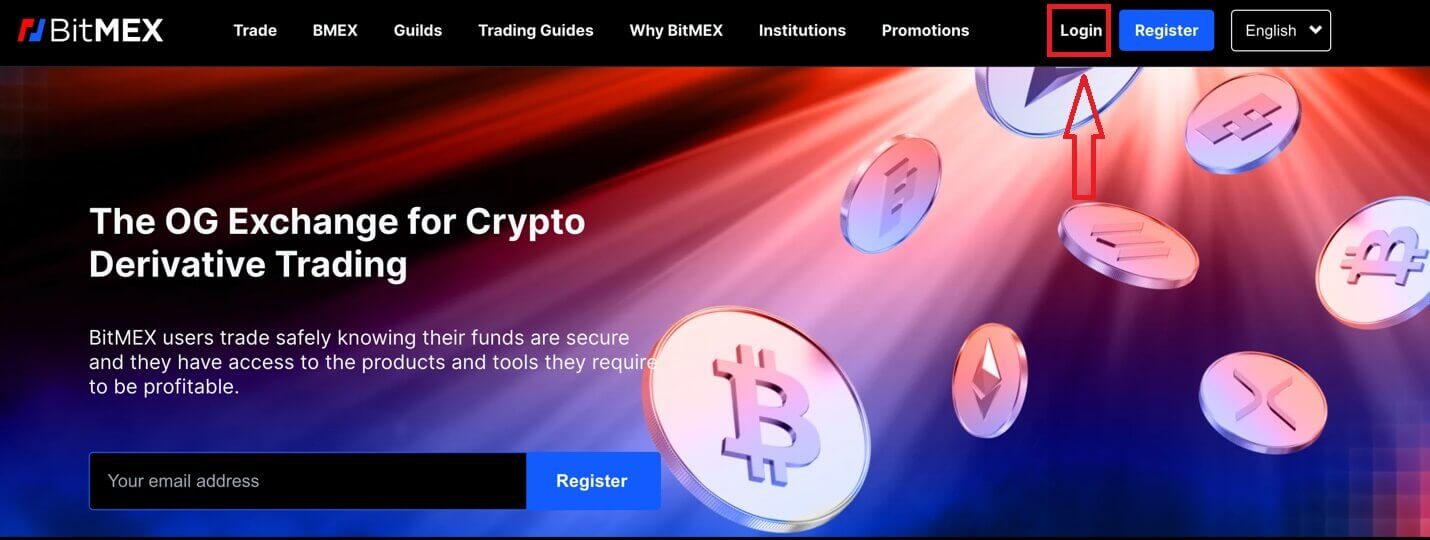
1. Open the BitMEX website and click on [Login] in the top right corner.
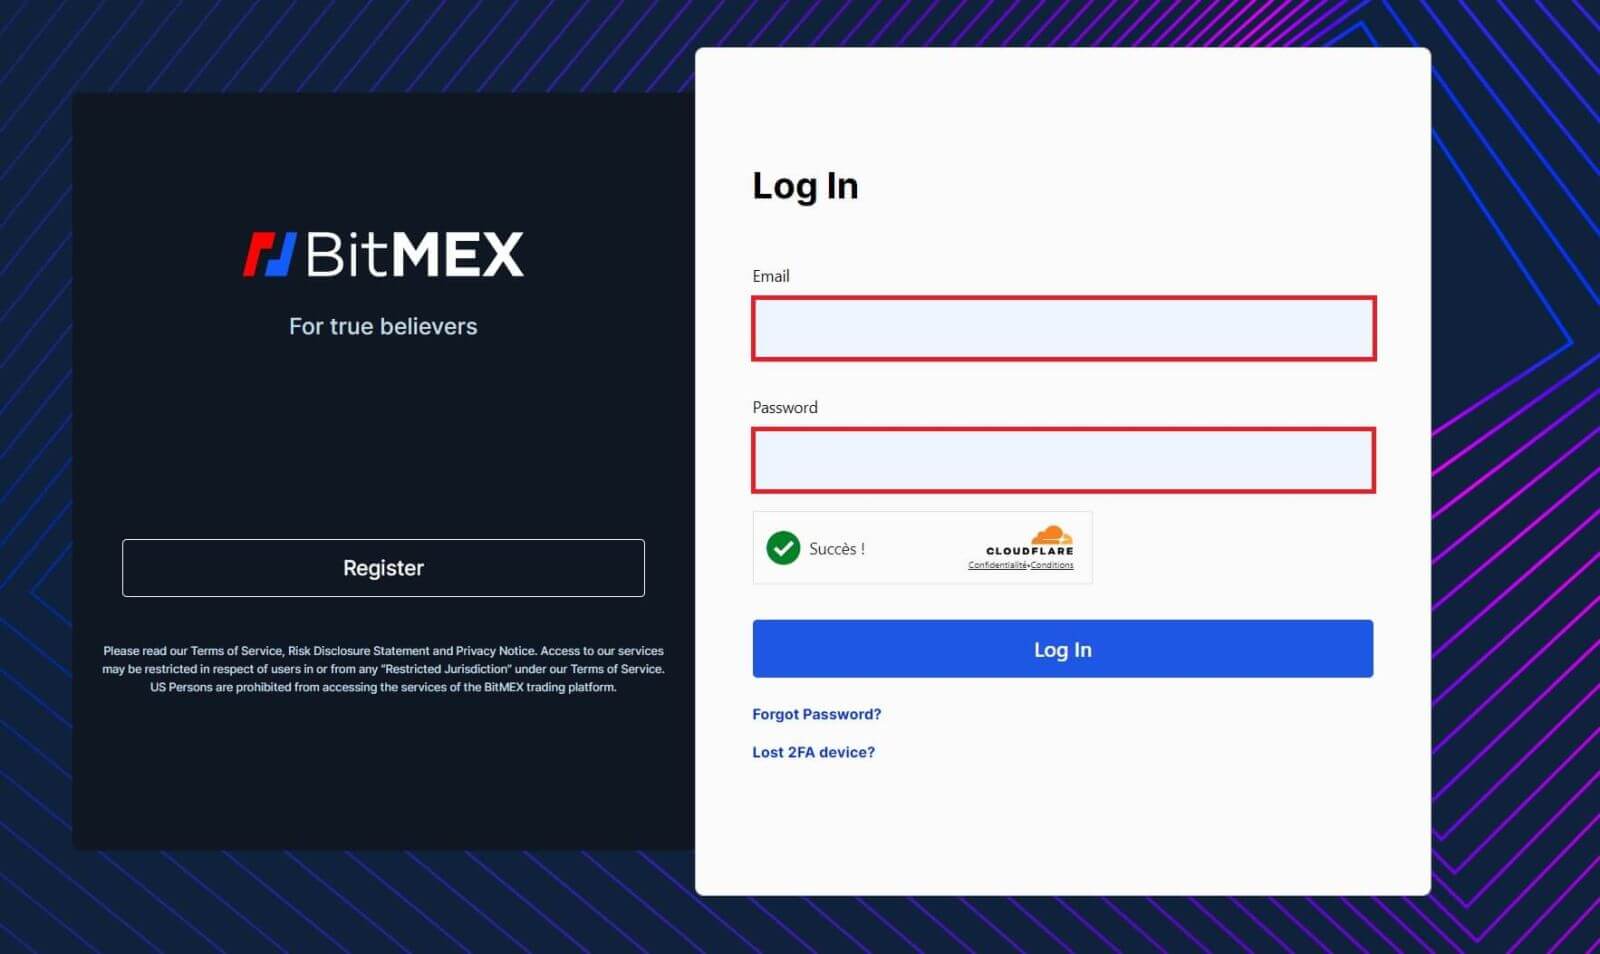
2. Fill out your email and password to log in.
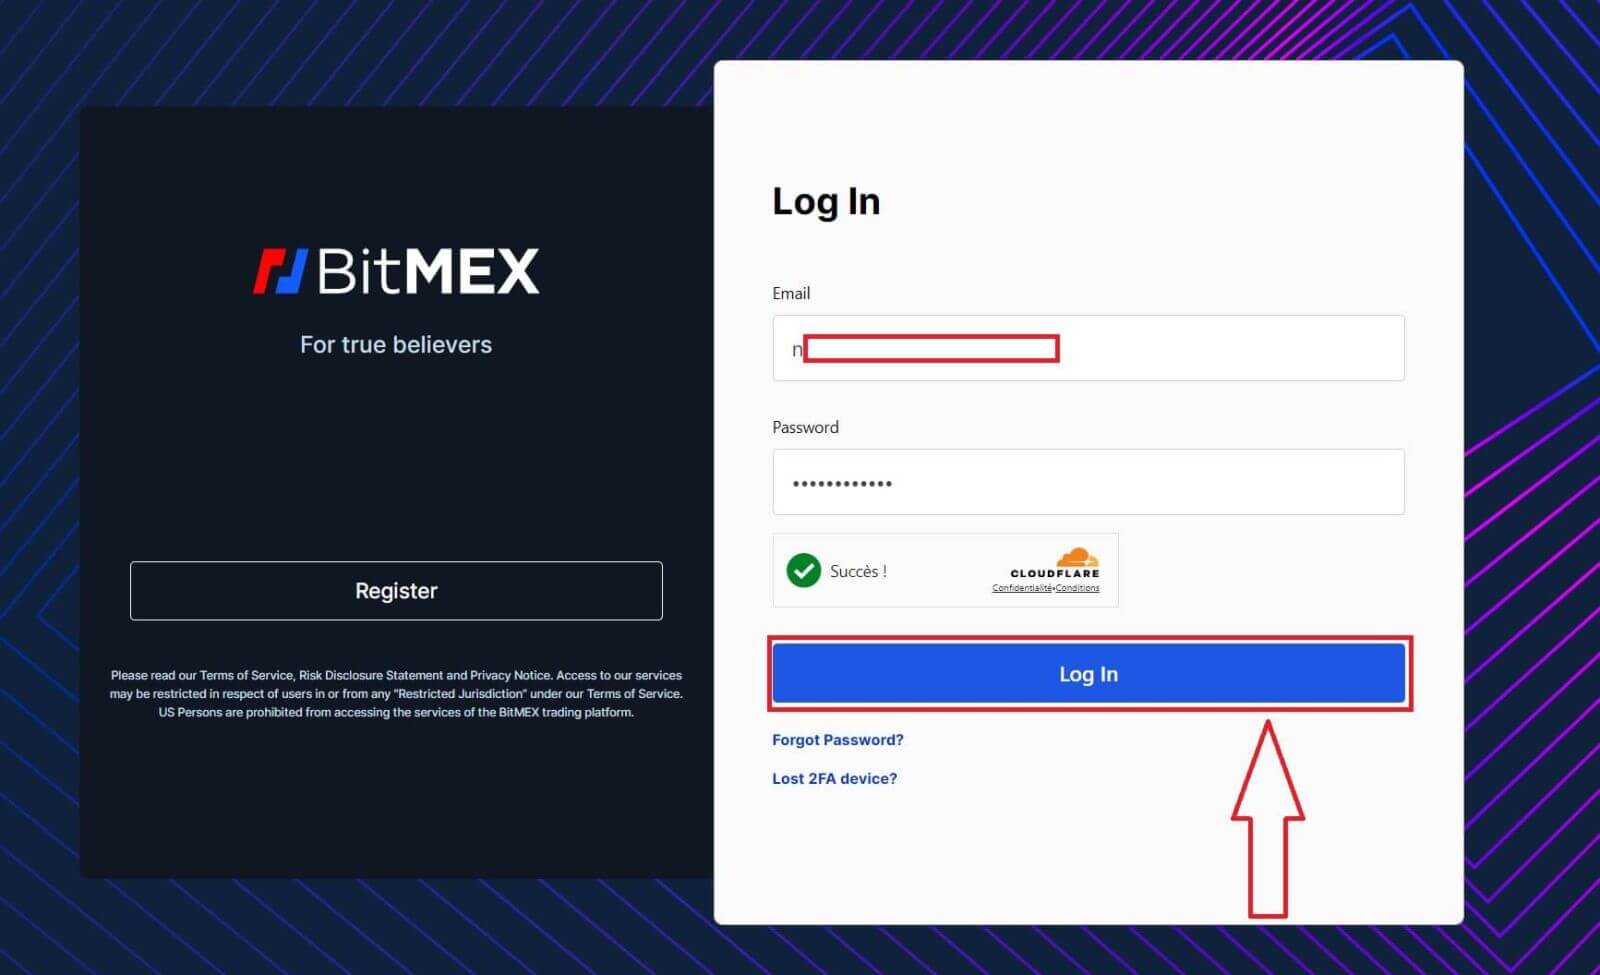
3. Click on [Login] to log in to your account.
4. Click on [Trade] and choose [Spot] for the Spot trading. The spot is using USDT to purchase digital assets like Bitcoin or ETH.

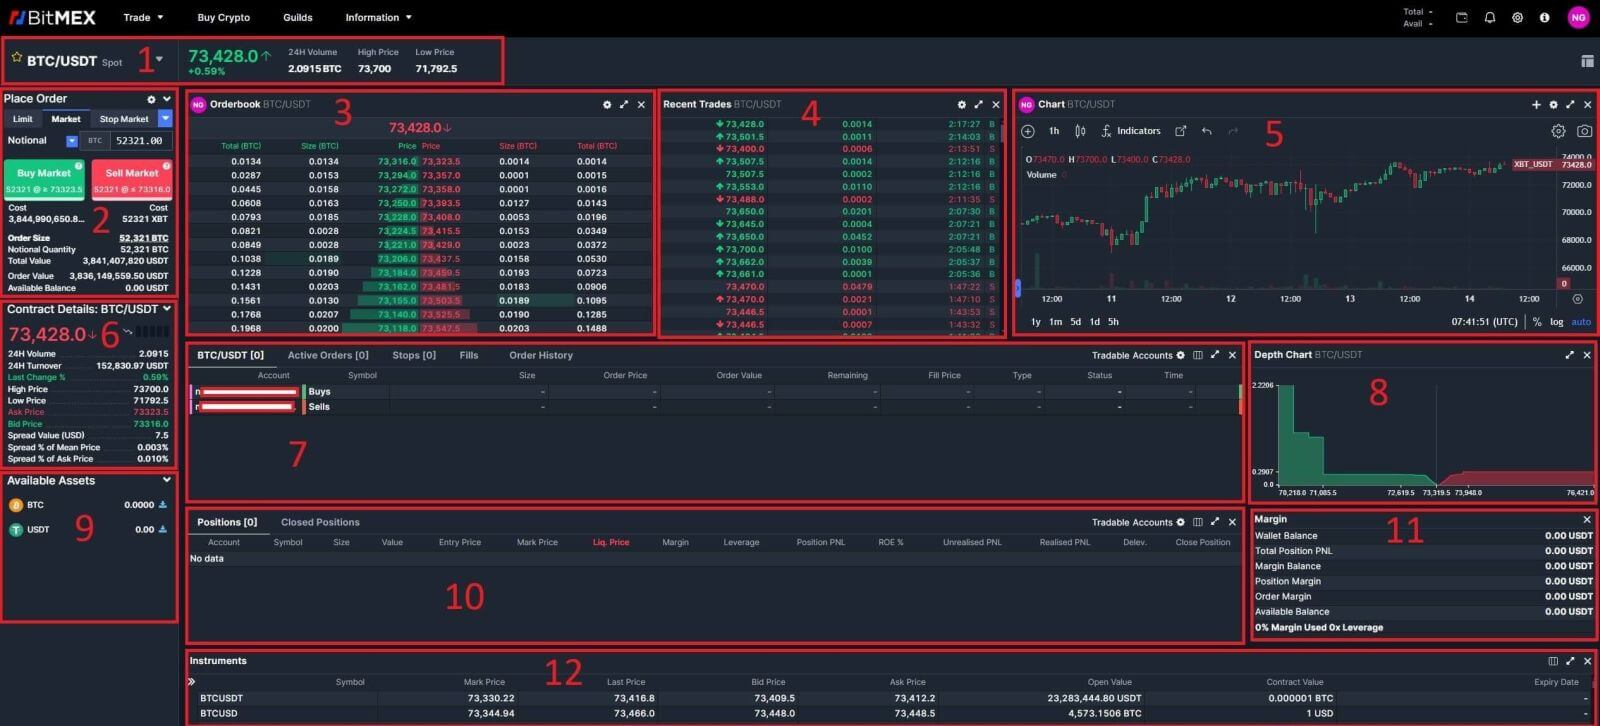
5. This is a view of BitMEX’s trading page interface.
-
The trading volume of Spot Pairs in 24 hours:
This refers to the total volume of trading activity that has occurred within the last 24 hours for specific spot pairs (e.g., BTC/USD, ETH/BTC).
-
Buy/Sell Section:
This is where traders can place orders to buy or sell cryptocurrencies. It typically includes options for market orders (executed immediately at the current market price) and limit orders (executed at a specified price).
-
Order Book:
The order book displays a list of all open buy and sell orders for a particular cryptocurrency pair. It shows the current market depth and helps traders gauge supply and demand levels.
-
Recent Trades:
This section shows a list of recent transactions that have been executed on the exchange, including details such as price, volume, and time.
-
Candlestick Chart:
Candlestick charts are graphical representations of price movements over a specific time period. They display opening, closing, and high, and low prices within the chosen timeframe, helping traders analyze price trends and patterns.
-
Contract Details, Spot Pairs:
This provides essential information about the spot pairs available for trading, including trading hours, tick size, minimum order size, and other contract specifications.
-
Spot Pair chosen order/Active Orders/Stops Limit Orders/Fills/Order History:
These sections allow traders to manage their orders, view active orders, monitor stop-limit orders, review filled orders, and access their complete order history.
-
Market Depth:
Market depth displays the cumulative volume of buy and sell orders at various price levels. It helps traders understand the liquidity of a market and identify potential support and resistance levels.
-
Available Assets:
This section lists all the cryptocurrencies and fiat currencies available for trading on the platform.
-
Positions/Closed Positions:
Traders can view their open positions and closed positions, including details such as entry price, exit price, profit/loss, and time of trade.
-
Margin Section:
This section is specific to margin trading, where traders can borrow funds from the exchange to increase their buying power. It includes options for managing margin positions and monitoring margin requirements.
-
Instruments:
Instruments refer to the various financial products available for trading on the platform, including spot pairs, futures contracts, options, and more.
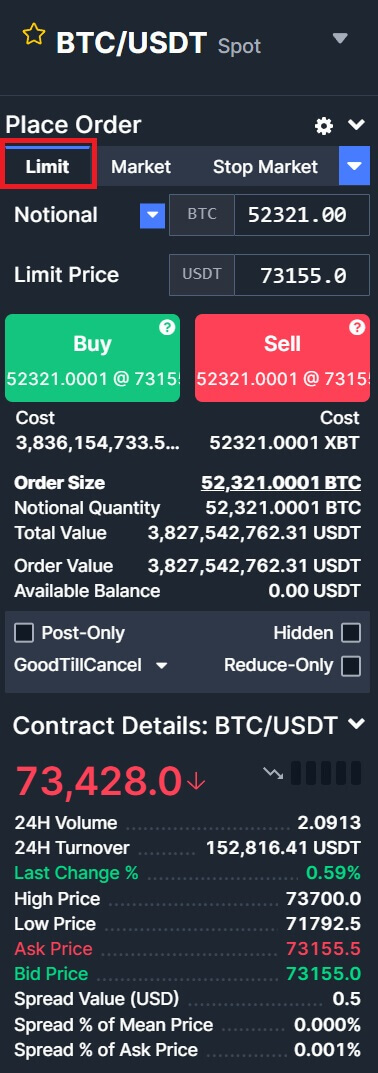
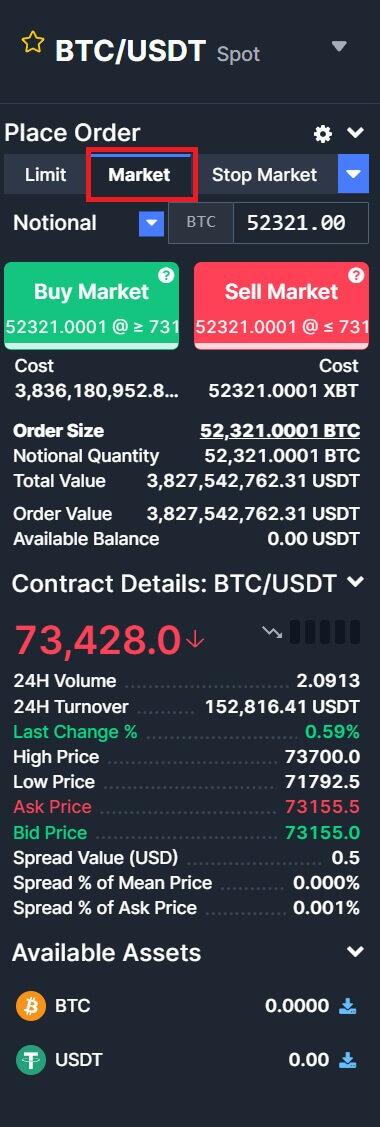
6. BitMEX has 2 Order Types:
- Limit Order:
- Market Order:
7. Choose the crypto you want to operate on the left crypto column. Then choose the trading type: [Buy] or [Sell] and the order type: [Limit Order] or [Market Order].
- Buying/Selling:
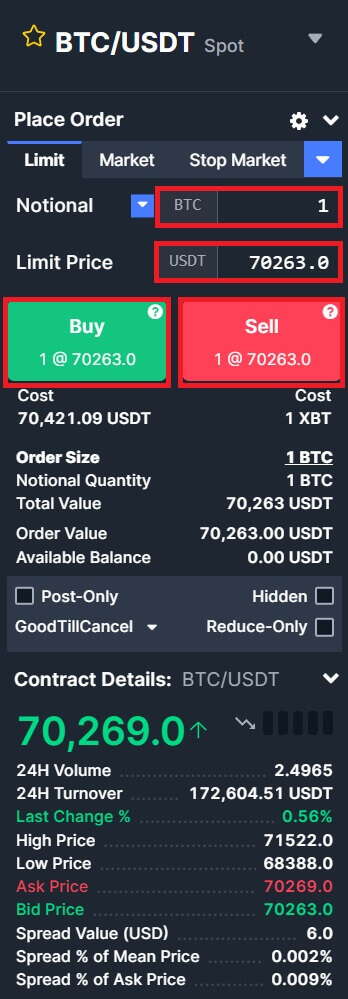
If you want to initiate a buy/sell order, enter the [Buy]/[Sell], [Notional], and [Limit Price] one by one in the blank. Finally, click [Buy]/[Sell] to execute the order.
- Example:
Suppose User A wants to trade the BTC/USDT pair, intending to buy 1 BTC with 70263 USDT. They input 1 in the [Notional] field, and 70263 in the [Limit Price] field, and the transaction details are automatically converted and shown below. Clicking [Buy]/[Sell] completes the transaction. When BTC reaches the set price of 70263 USDT, the buy order will be executed.
How to Trade Spot on BitMEX (App)
1. Open your BitMEX app on your phone and click on [Login].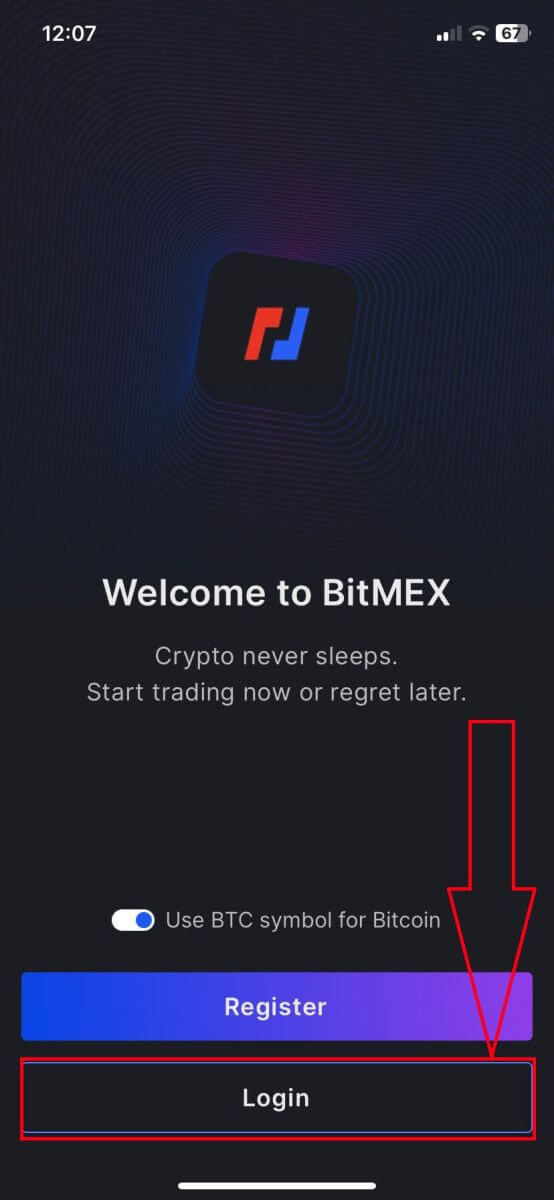
2. Fill out your email and password to log in, remember to tick on the box to verify that you are human.
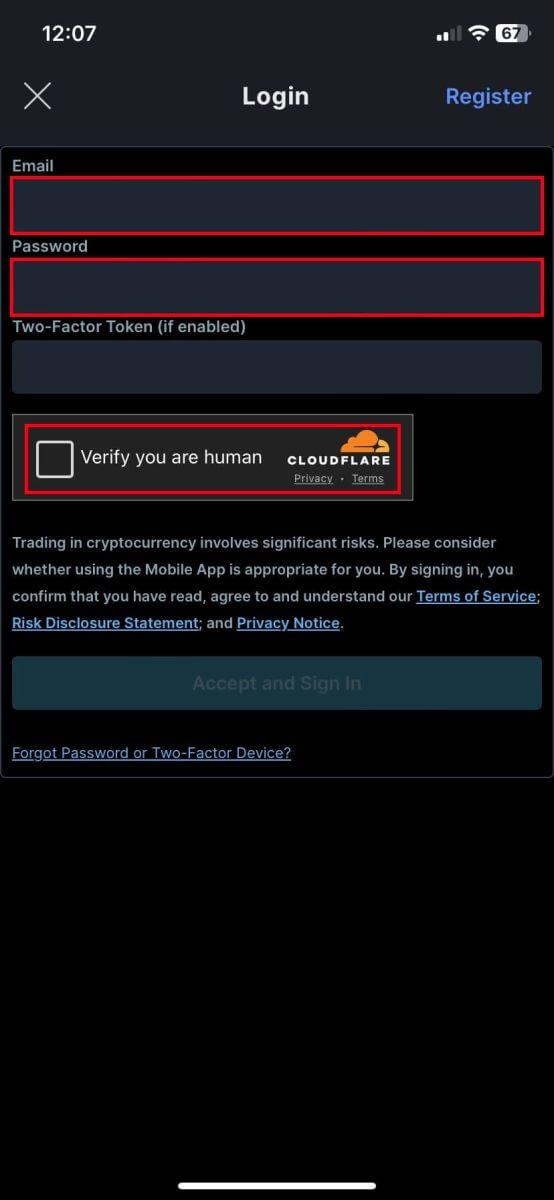
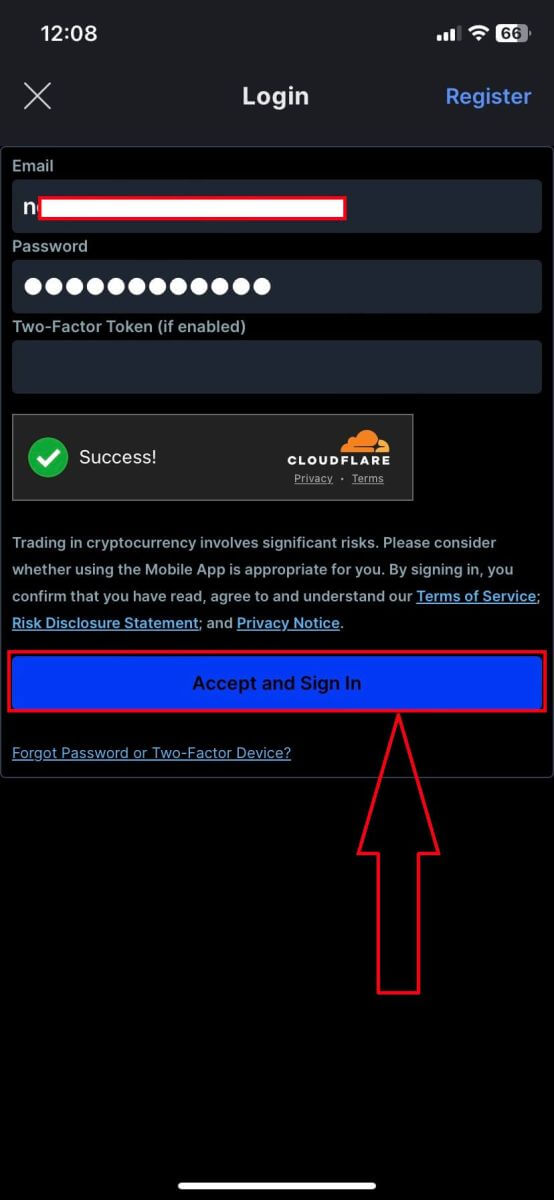
3. Click on [Accept and Sign In] to continue.
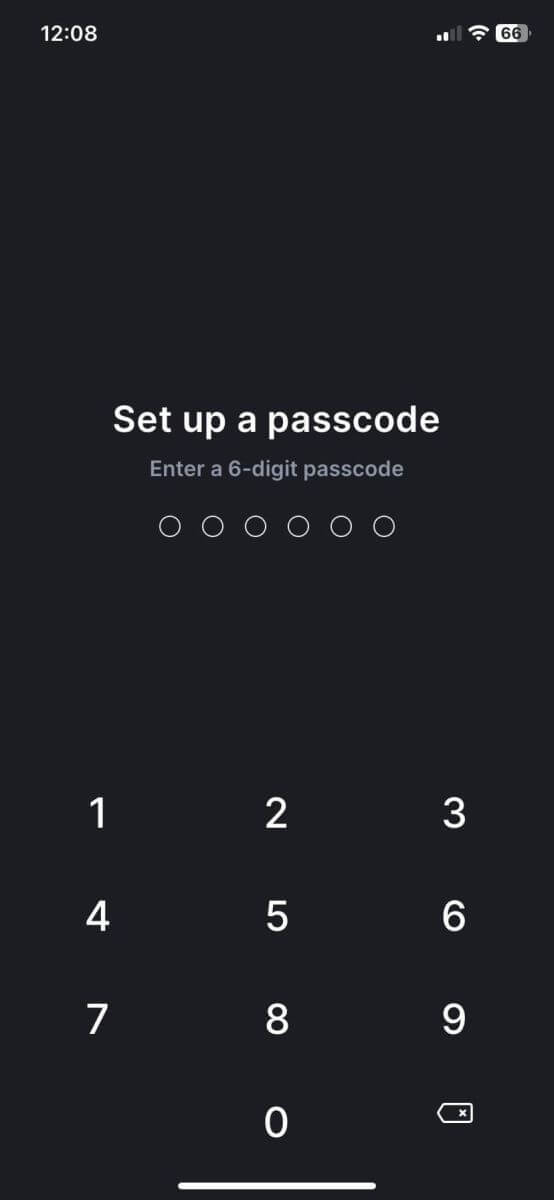
4. Set up your 2nd password to ensure the security.
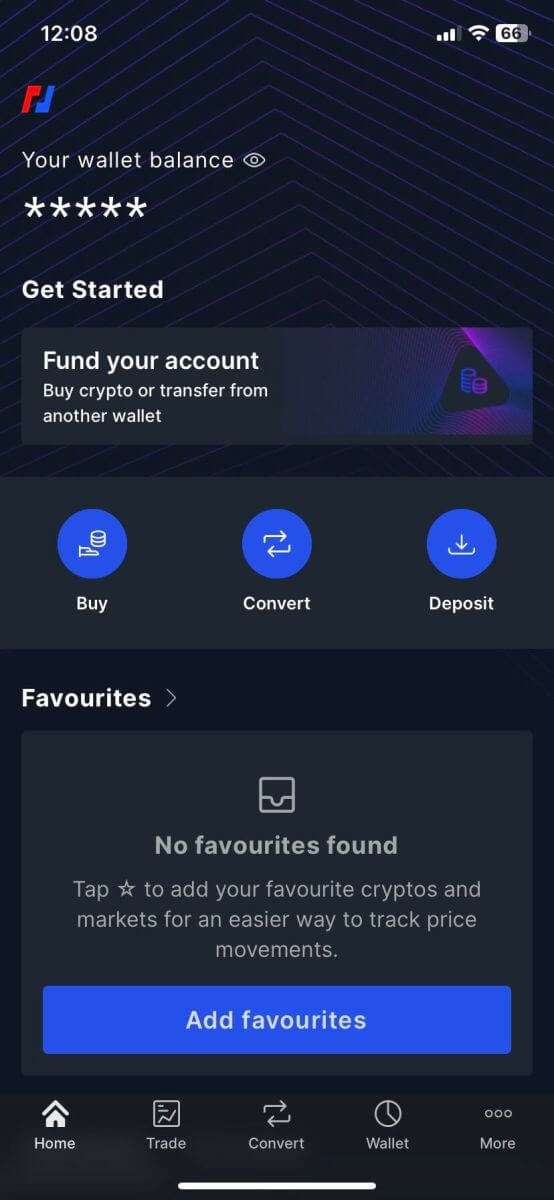
5. Here is the home page after you login successfully.
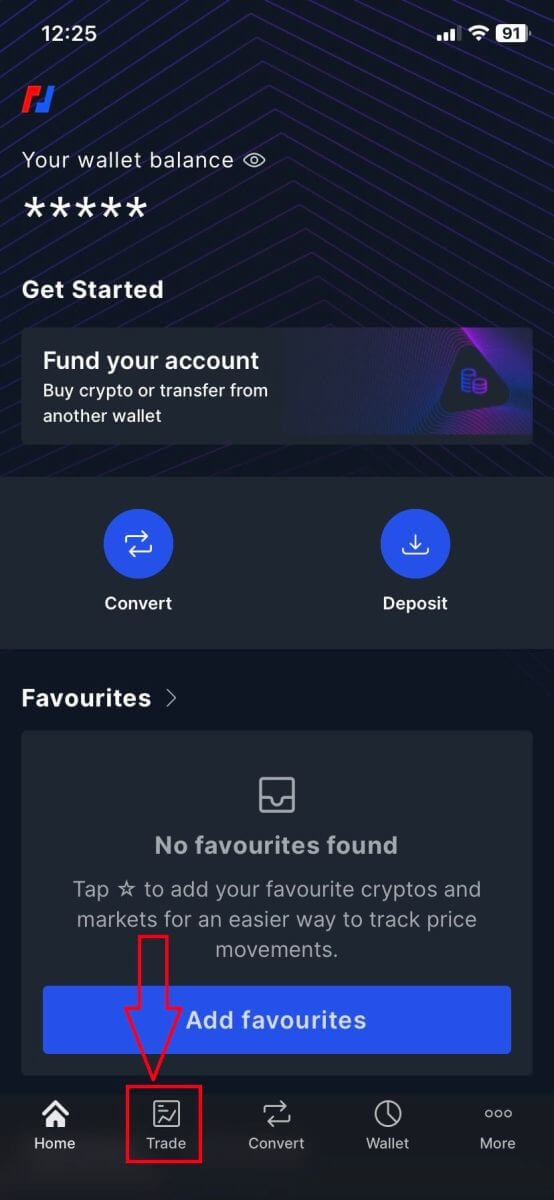
6. Click on [Trade] to enter the trading interface.
7. This is BitMEX at the trading page interface on mobile.
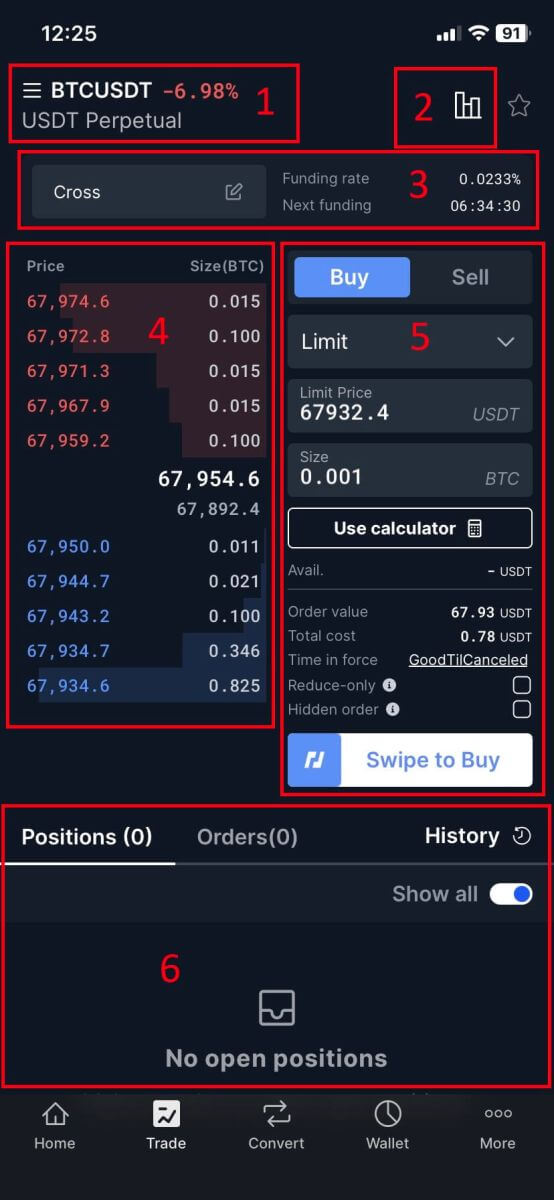
-
Spot Pairs:
Spot pairs are trading pairs where transactions are settled "on the spot," meaning they are executed immediately at the current market price.
-
Candlestick Chart:
Candlestick charts visually represent the price movement of a financial instrument, such as a cryptocurrency, over a specific period of time. Each candlestick typically shows the open, high, low, and close prices for that time frame, allowing traders to analyze price trends and patterns
-
Margin Mode/Funding Rate/Next Funding:
These features are related to margin trading, where traders borrow funds to increase their buying power.
Margin Mode: This indicates whether the trader’s account is in margin mode, enabling them to borrow funds.
Next Funding: This displays the estimated time and rate of the next funding period in perpetual futures contracts.
Funding Rate: In perpetual futures contracts, funding rates are periodically exchanged between long and short positions to maintain the contract’s price close to the underlying asset’s spot price.
-
Order Book:
The order book is a real-time list of buy and sell orders for a particular trading pair. It displays the quantity and price of each order, allowing traders to gauge market sentiment and liquidity.
-
Buy/Sell Section:
This section provides traders with the interface to place market orders, where orders are executed immediately at the current market price, or limit orders, where traders specify the price at which they want their order to be executed.
-
Trading History and Open Orders:
This section displays the trader’s recent trading activity, including executed trades and open orders that have not yet been filled or canceled. It typically shows details such as order type, quantity, price, and time of execution.
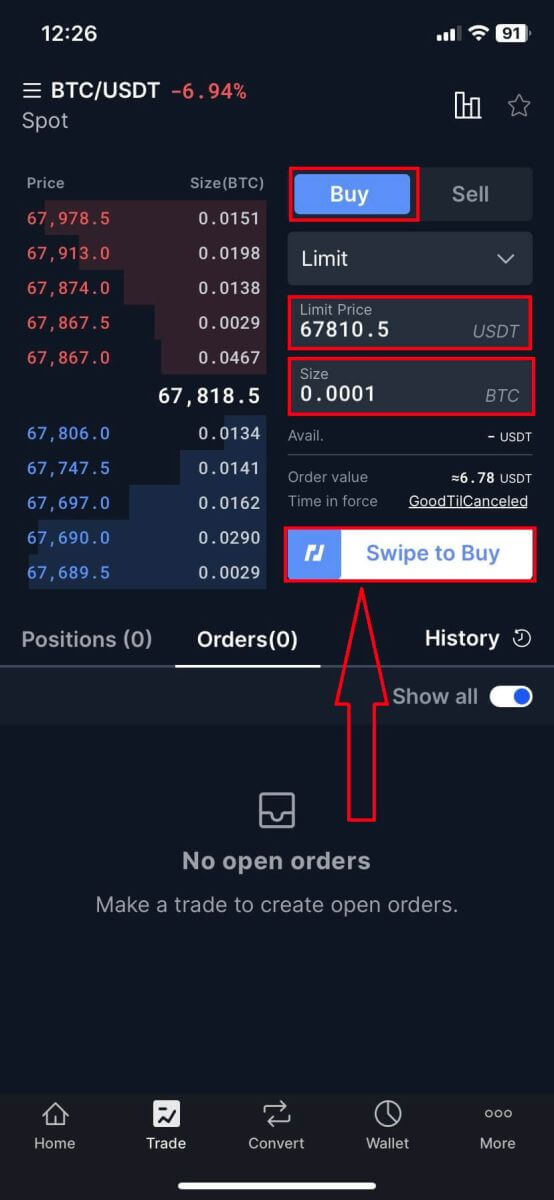
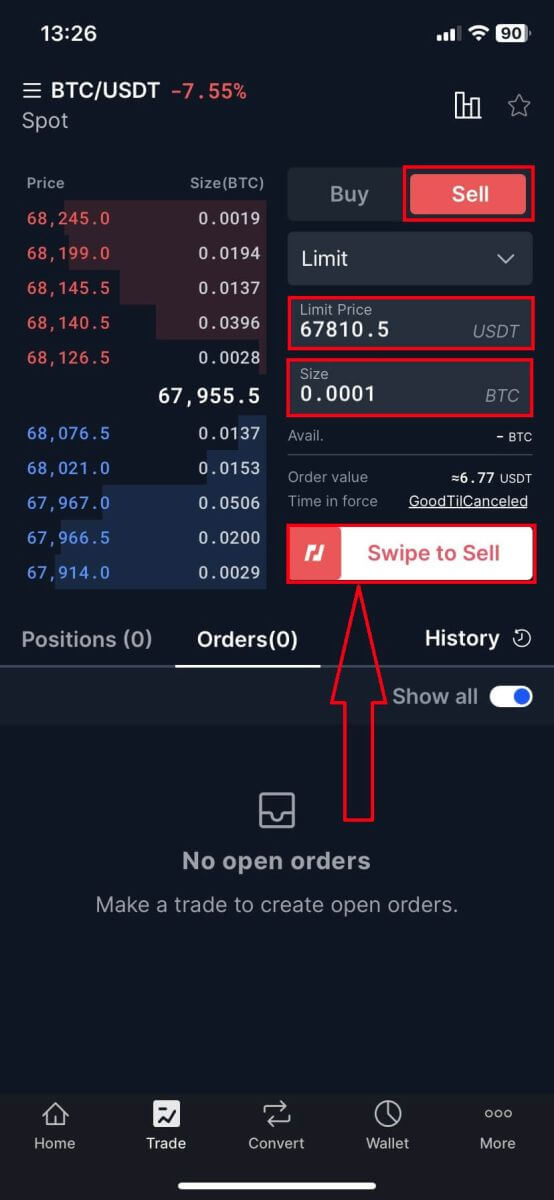
- Buying/Selling:
If you want to initiate a buy/sell order, enter the [Buy]/[Sell], [Size], and [Limit Price] one by one in the blank. Finally, click [Buy]/[Sell] to execute the order.
- Example:
Suppose User A wants to trade the BTC/USDT pair, intending to buy 0.0001 BTC with 67810.5 USDT. They input 0.0001 in the [Size] field, and 67810.5 in the [Limit Price] field, and the transaction details are automatically converted and shown below. Clicking [Buy]/[Sell] completes the transaction. When BTC reaches the set price of 67810.5 USDT, the buy order will be executed.
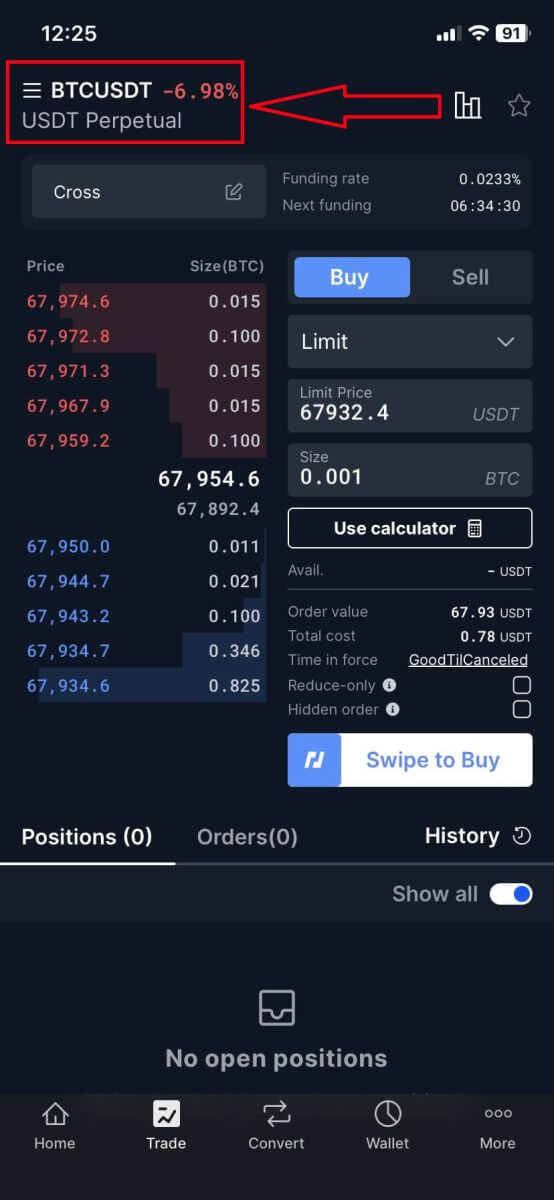
9. Click on the trading pairs.
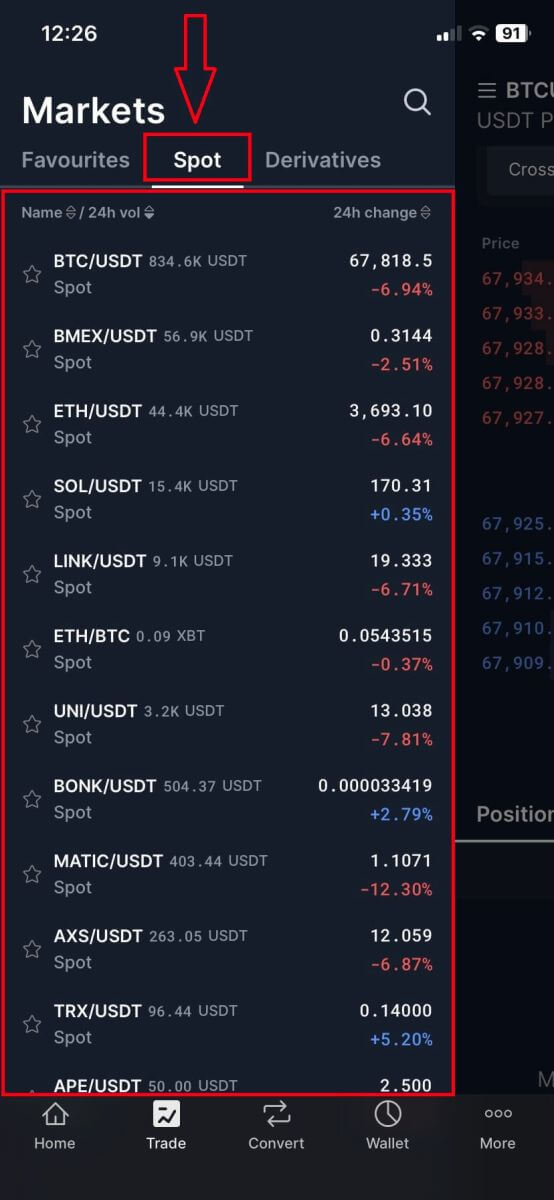
10. Select [Spot] and choose the Spot Pairs.
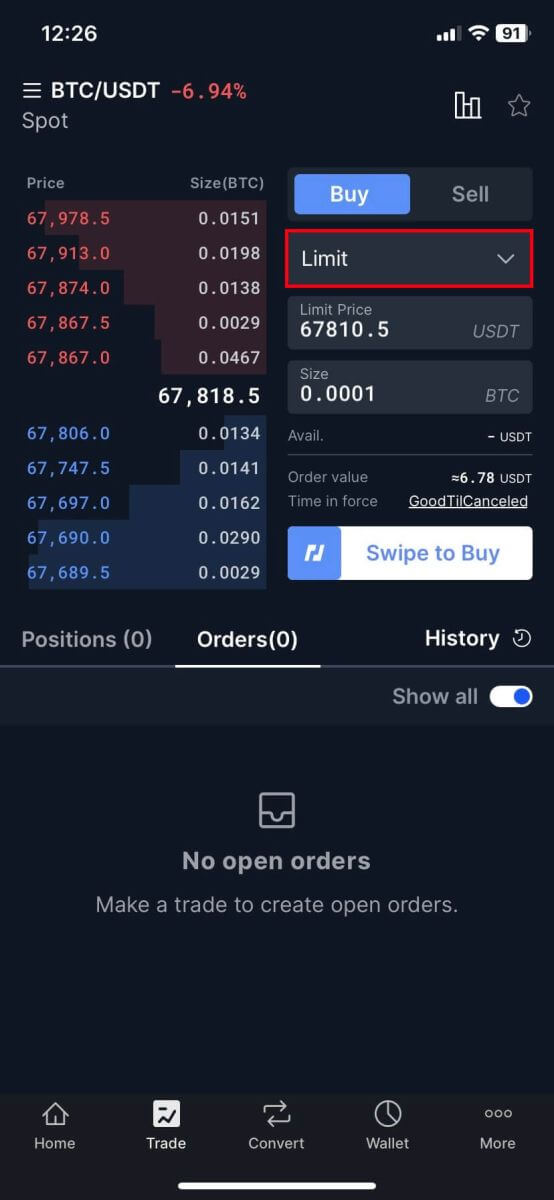
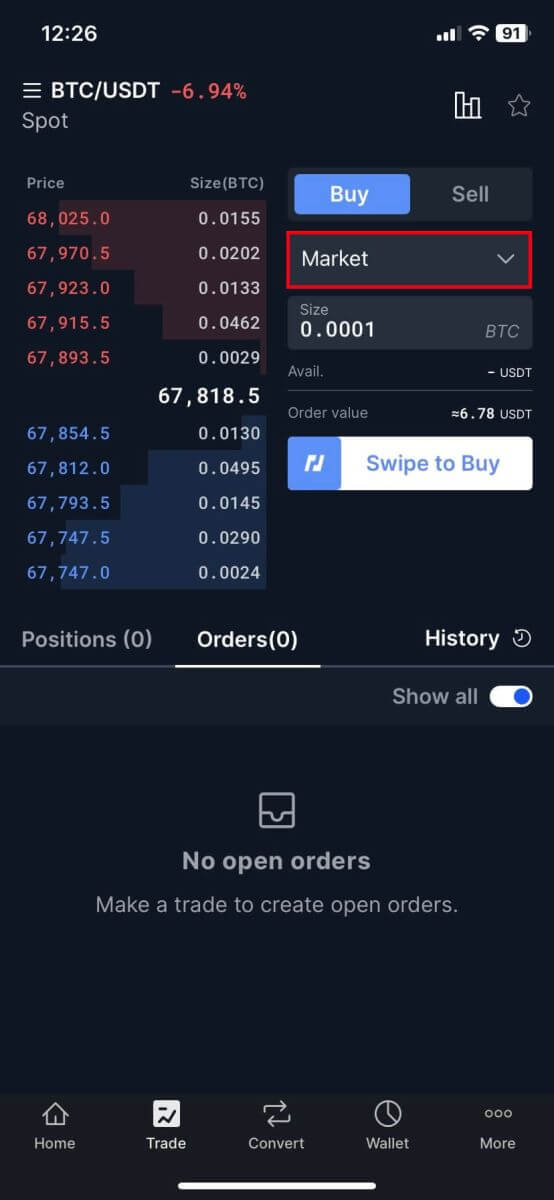
11. BitMEX has 2 Order Types:
- Limit Order:
- Market Order:
This order type will automatically execute the trade at the current best price available in the market.
12. Enter the [Limit Price] and [Size/Notation] and swipe on [Swipe to Buy].
13. Similar to the Selling section.
What is the Stop-Limit Function and How to use it
What is a stop-limit order?
A stop-limit order combines elements of both a stop order and a limit order, offering more control over trade execution. It includes a stop price, at which the order is activated, and a limit price, at which the order is executed.
When the asset’s price hits the stop price, the stop-limit order becomes active and is placed on the order book. Subsequently, when the price reaches the limit price, the order is executed.
Stop price: This is the trigger point for the stop-limit order. When the asset’s price hits this level, the order is activated to buy or sell at the limit price or better.
Limit price: The designated price or potentially better price at which the stop-limit order is executed.
It’s advisable to set the stop price slightly higher than the limit price for sell orders, creating a buffer zone to ensure execution even if prices fluctuate. Conversely, for buy orders, setting the stop price slightly lower than the limit price can mitigate the risk of non-execution.
It’s crucial to note that once the market price reaches the limit price, the order is treated as a limit order. Setting excessively high stop-loss limits or excessively low take-profit limits may result in orders not being filled, as the market price may not reach the specified limit.
In summary, a well-calibrated stop-limit order provides a balance between trigger and execution prices, optimizing trade execution while managing risk.
How to create a stop-limit order
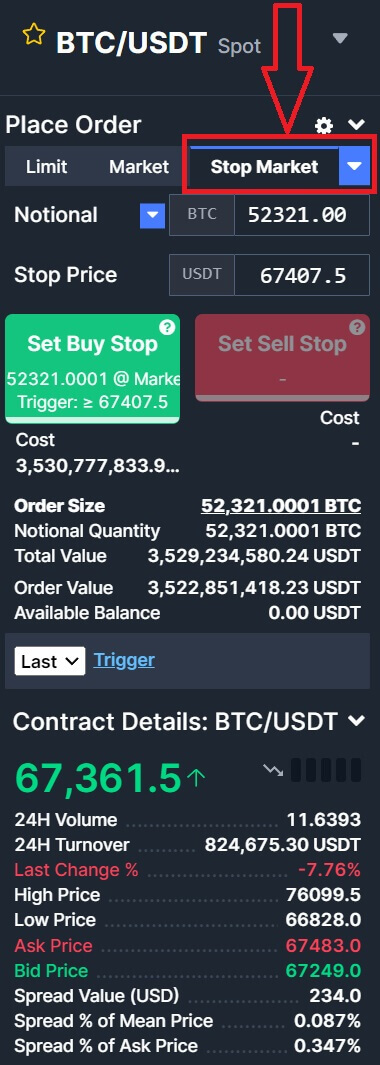
How to place a stop-limit order on BitMEX?1. Click on [Stop Market] to extend options.
2. Select the [Stop Limit] to continue.
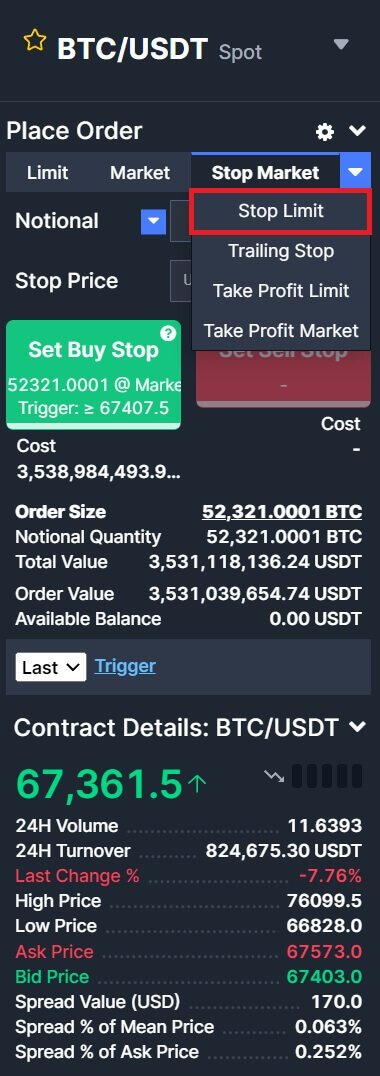
3. Enter the [Stop price], [Limit price], and the [Notional] of crypto you wish to purchase. Click [Set Buy Stop] to confirm the details of the transaction.

How to view my stop-limit orders?
Once you submit the orders, you can view and edit your stop-limit orders under [Orders History].

Frequently Asked Questions (FAQ)
How are the fees calculated for spot trading?
When trading on BitMEX, there are two types of fees: Taker Fees and Maker Fees. Here is what these fees mean:
Taker Fees
- Taker fees are charged when you place an order that is executed immediately at the market price.
- These fees apply when you are "taking" liquidity from the order book.
- The fee amount is calculated based on the appropriate fee tier.
- BitMEX assumes the highest fee based on the fee tier and locks the total order amount plus fees.
Maker Fees
- Maker fees are charged when you place an order that is not executed immediately but instead adds liquidity to the order book.
- These fees apply when you are "making" liquidity by placing a limit order.
- The fee amount is calculated based on the appropriate fee tier.
- BitMEX assumes the highest fee based on the fee tier and locks the total order amount plus fees.
Example Scenario
Suppose you want to place a buy order of 1 XBT (Bitcoin) at a limit price of 40,000.00 USDT (Tether).
- Before executing the trade, the system checks if you have sufficient balance to cover the trade.
- Based on the fee rate of 0.1%, you will need to have at least 40,040.00 USD in your wallet to submit this trade.
- If the actual fee amount, when the order is filled, turns out to be lower than the initially assumed fees, the difference will be refunded to you.
How are the fees charged for spot trading?
BitMEX spot fees are charged in the quote currency. This means the fees are taken from the currency you spend when buying and the currency you receive when selling. For example, if you placed an order to buy XBT with USDT, your fees will be charged in USDT.
Is ROE my Realised PNL?
Return on Equity (ROE) is not the same as Realised PNL (Profit and Loss). ROE measures the percentage return on your trading capital, factoring in the impact of leverage, while PNL represents the actual financial gain or loss from your trades. They are related but distinct metrics, each providing valuable insights into your trading performance from different perspectives.
What is ROE?
ROE is a percentage measure that indicates the return on your equity. It shows how much profit you have made relative to your initial investment. The formula for calculating ROE is:
ROE% = PNL % * Leverage
What is Realised PNL?
PNL represents the actual profit or loss you have realized from your trades. It is calculated based on the difference between your Average Entry Price and Exit Price for each trade, considering the number of contracts traded, the multiplier, and fees. PNL is a direct measure of the financial gain or loss from your trading activities. The formula for calculating it is:
Unrealised PNL = Number of Contracts * Multiplier * (1/Average Entry Price - 1/Exit Price)
Realised PNL = Unrealised PNL - taker fee + maker rebate -/+ funding payment
Can ROE% be higher than the PNL value?
It is possible to see a higher ROE% than your PNL because ROE% takes into account the leverage you have used, while PNL calculation does not. For example, if you have a 2% PNL and you used 10x leverage, your ROE% would be 20% (2% * 10). In this scenario, the ROE% is higher than the PNL due to the impact of leverage.
Similarly, if two positions have identical values but different leverage levels, the position with higher leverage will show a larger ROE, while the actual PNL amount will remain the same for both.
Why didn’t my Stop Order trigger before I was liquidated?
Why your Stop Order wasn’t triggered before you were liquidated depends on a lot of factors (such as the order type, execution instructions, and market movement). Here are some common reasons positions get liquidated before the Stop Order is triggered:
| Text | Order Type Execution Instructions | Reason |
|---|---|---|
|
Rejected: Position in liquidation |
Order Type: Stop Limit or Market execs: Last |
Liquidations are based on Mark Price. Since the Mark Price can differ from the Last Price, it’s possible for Mark Price to reach your Liquidation Price before the Last Price can reach your Trigger/Stop Price. To make sure your Stop order triggers before you’re liquidated, you can set the Trigger Price to Mark or place your Stop Order further from your Liquidation Price. |
|
Canceled: Position in liquidation Canceled: Cancel from BitMEX if it was canceled by you. |
Order Type: Stop Limit |
When you place a Limit Order with the Stop Price and Limit Price close together, you run the risk in periods of high volatility that your order will be triggered, sit in the Oderbook, and won’t get filled. This is because the price moves past your Limit Price immediately after it is triggered and before the order can be filled. To prevent your order from sitting in the order book, it is safer to use a larger spread between your Stop Price and your Limit Price as it will ensure there is enough liquidity between the two prices to fill your order |
|
Rejected: Position in liquidation Rejected: Executing at the order price would lead to immediate liquidation |
Order Type: Stop Market no "execInst: Last" or "execs: Index" (implying a trigger price of "Mark") |
Once a stop order is triggered, an order is submitted to the exchange; however, in a fast-moving market, users may experience slippage. Due to that, the Mark Price could reach the liquidation price before the order can be executed. Also, if your Stop Market order is close to your Liquidation price, it’s especially possible that, by the time the Stop triggers and the Market Order is placed, the order book moves to a range where it can’t fill before your liquidation. |
Why has my Liquidation Price changed?
Your Liquidation Price could have changed if:
- You changed your leverage,
- You are on cross-margin,
- You manually removed/added Margin from/to the position,
- or margin was lost through funding payments
Why was I liquidated if the price on the chart didn’t reach my Liquidation Price?
The candlesticks shown on the Trading Chart represent the Last Price of the contract and the purple line on the chart represents the Index Price. The Mark Price, by which positions are liquidated, is not shown on the chart and that’s why you don’t see that your Liquidation Price has been reached.
To confirm that the Mark Price has reached your Liquidation Price.
Why was my order canceled/rejected?
Where can I see the reason my order got canceled?
To see why your order was canceled/rejected, you can refer to the Text column on the Order History page. Click on the? icon to display the entire text:
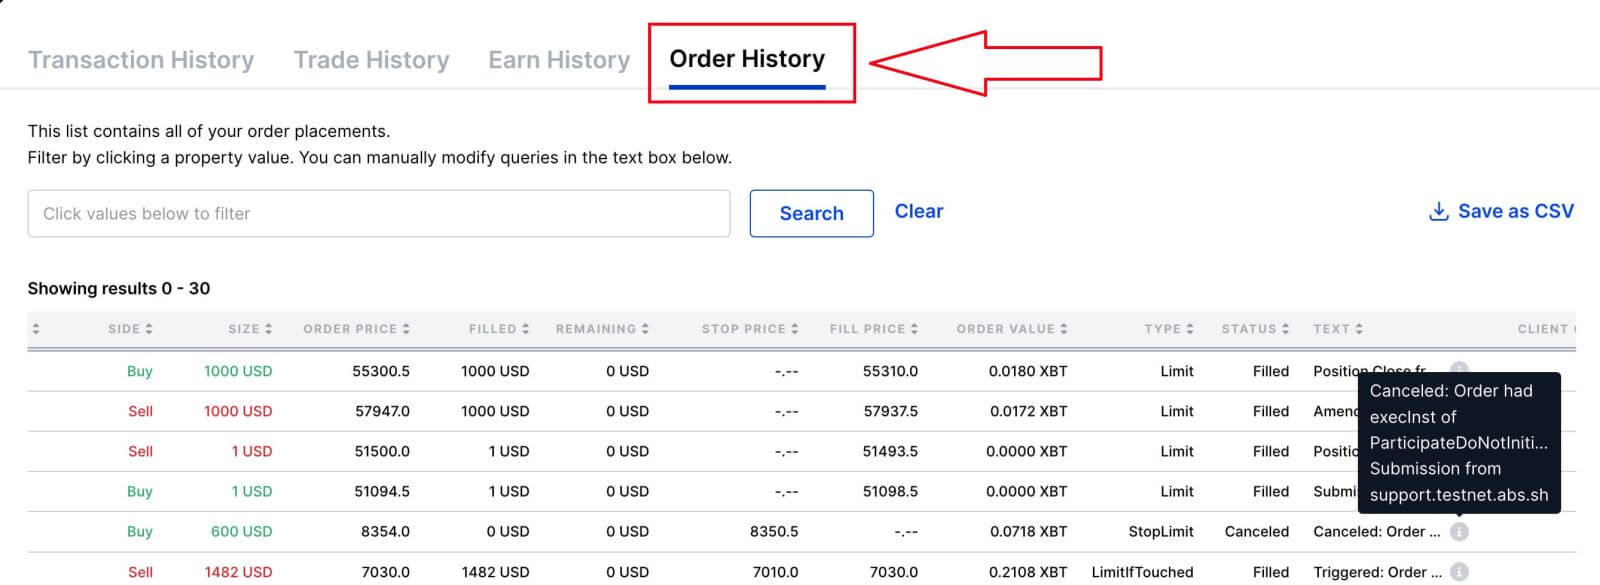 If you want to double-check whether your order really met the requirements for that text (such as "had execInst of ParticipateDoNotInitiate"), you can hover over the Type value in the Order History tab on the Trade page. It will tell you all the instructions/details you’ve set up for that order.

Explanations of Canceled/Rejected Texts:
| Text | Type and Instructions | Reason |
|---|---|---|
| Canceled: Cancel from www.bitmex.com | N/A | If you see this text, it means the order was canceled by you through the site |
| Canceled: Cancel from API | N/A | The order was canceled by you through the API |
| Canceled: Position in liquidation | N/A |
The order was canceled because your position entered liquidation. All open orders, including untriggered stops, will be canceled when a position enters liquidation. Once your position has been liquidated you are free to place new orders. |
| Canceled: The order had an exercise of ParticipateDoNotInitiate | ExecInst: ParticipateDoNotInitiate |
ParticipateDoNotInitiate refers to the "Post Only" checkmark. "Post Only" orders get canceled if they are to be filled immediately. If you don’t mind getting filled immediately and paying the taker fee, you can just uncheck this box. Otherwise, you’ll need to change your Limit Price to make sure your order is not going to get filled as soon as it hits the order book. |
| Canceled: Order had execInst of Close or ReduceOnly but current position is X |
ExecInst: Close or ExecInst: ReduceOnly |
ExecInst: Close refers to the "Close on Trigger" check. If "Close on Trigger" or "Reduce Only" is enabled for an order, it will get canceled if it were to increase your position size. If you’re looking to increase your position size, make sure you uncheck this. Otherwise, make sure the size of your order equals your open position size and is in a different direction. |
| Canceled: Order had execInst of Close or ReduceOnly but open sell/buy orders exceed the current position of X |
ExecInst: Close or ExecInst: ReduceOnly |
In the case that you have open orders already totaling more than your open position, we will cancel your order instead of letting it trigger, as there is a chance that this order could open a new position; closing orders prevent this from happening |
|
Cancelled: The account has insufficient Available Balance or Rejected: Account has insufficient Available Balance |
no "ExecInst: Close" or no "ExecInst: ReduceOnly" |
Your available balance is less than the required margin to place the order. If it’s a close order, you can avoid the margin requirement with "Reduce Only" or "Close on Trigger". Otherwise, you’ll need to either deposit more funds or adjust your order to require less margin. |
| Rejected: Executing at the order price would lead to immediate liquidation | N/A | The engine calculated the average fill price for your order and found that it would draw the entry price over the liquidation price. |
| Rejected: Value of position and orders exceeds position Risk Limit | N/A | When the stop was triggered, the net value of your position plus all open orders exceeded your risk limit. Please read the Risk Limit document for more information on this. |
| Rejected: Order price is below liquidation price of current [Long/Short] position | N/A | The Limit Price of your order is below the Liquidation Price of your current position. This is not automatically canceled at submission because we cannot predict what the Liquidation Price will be when the order triggers. |
| Rejected: Order Submission Error | N/A |
When load spikes, we cannot service every incoming request while maintaining acceptable response times, therefore we implemented a cap on the maximum number of requests that can enter the engine queue, after which, new requests are rejected until the queue has shrunk. If your order gets rejected for this reason, you’ll see this text or "System Overload" message.
|
| Rejected: Aggressive limit/pegged orders have exceeded far touch size and price thresholds | N/A | We protect the integrity of the market against large aggressive orders that are likely due to an input error and which may severely affect prices. This is referred to as the Fat Finger Protection Rule. If you see this text, the order violated this rule. For more details on it, please refer to Trading Rules: Fat Finger Protection |
| Canceled: Order had timeInForce of ImmediateOrCancel |
Type: Limit TIF: ImmediateOrCancel |
When timeInForce is ImmediateOrCancel, any unfilled portion is canceled after the order is placed. |
| Canceled: Order had timeInForce of ImmediateOrCancel |
Type: Market TIF: ImmediateOrCancel |
When a Market order is triggered, the Engine calculates an effective limit price for the order based on information such as your account balance, to complete necessary risk checks. If due to liquidity, the order cannot be executed before reaching the effective limit price, the order will be cancelled with the message you received |
| Canceled: Order had timeInForce of FillOrKill |
Type: Limit TIF: FillOrKill |
When timeInForce is FillOrKill, the entire order gets canceled if it can’t immediately fill fully once it gets executed. |
Why didn’t my Stop order trigger before I was liquidated?
| Text | Type Instructions | Reason |
|---|---|---|
|
Rejected: Position in liquidation |
Order Type: Stop Limit or Market execs: Last |
Liquidations are based on Mark Price. Since the Mark Price can differ from the Last Price, the Mark Price can reach your Liquidation Price before the Last Price can reach your Trigger/Stop Price. To make sure your Stop order triggers before you’re liquidated, you can set the Trigger Price to Mark or place your Stop Order further from your Liquidation Price. |
|
Canceled: Position in liquidation Canceled: Cancel from BitMEX if it was canceled by you. |
Order Type: Stop Limit |
When you place a Limit Order with the Stop Price and Limit Price close together, you run the risk in periods of high volatility that your order will be triggered, sit in the Oderbook, and won’t get filled. This is because the price moves past your Limit Price immediately after it is triggered and before the order can be filled. To prevent your order from sitting in the order book, it is safer to use a larger spread between your Stop Price and your Limit Price as it will ensure there is enough liquidity between the two prices to fill your order |
|
Rejected: Position in liquidation Rejected: Executing at the order price would lead to immediate liquidation |
Order Type: Stop Market no "execInst: Last" or "execs: Index" (implying a trigger price of "Mark") |
Once a stop order is triggered, an order is submitted to the exchange; however, in a fast-moving market, users may experience slippage. Due to that, the Mark Price could reach the liquidation price before the order can be executed. Also, if your Stop Market order is close to your Liquidation price, it’s especially possible that, by the time the Stop triggers and the Market Order is placed, the order book moves to a range where it can’t fill before your liquidation. |
Why was my order filled at a different price?
The reason why an order could get filled at a different price depends on the order type. Have a look at the chart below to see the reasons for each:
| Order Type | Reason |
|---|---|
| Market Order |
Market orders do not guarantee a specific fill price and may be subject to slippage. If you wish to have more control over the price you get filled at, we recommend using Limit orders, as that way, you can set a Limit Price. |
| Stop Market Order |
A Stop Market Order states that one is willing to buy or sell at the market price when the Trigger Price reaches the Stop Price. Stop Market Orders can get filled at a different price than the Stop Price if the orderbook moves significantly between the time that the order triggers and gets filled. You can avoid slippage by using Stop Limit Orders instead. With Limit orders, it will get executed only at the Limit Price or better. There is a risk, however, that if the price moves sharply away from the Limit Price, there may not be an order to match it and it will end up resting in the order book instead. |
| Limit Order |
Limit Orders are meant to execute at the Limit Price or better. This means you can get executed at a Limit Price or lower for Buy orders and at a Limit Price or higher for Sell orders. |
Does BitMEX get any cut of the funding fee?
BitMEX does not get any cut, the fee is completely peer-to-peer. The fee is paid either from long positions to shorts, or short positions to longs (depending on whether the fee rate is positive or negative.)


