How to do Futures Trading on BitMEX
What are Futures Contracts Trading?
Futures Trading: In the Futures market, a position opened is a Futures contract representing the value of a specific cryptocurrency. When it is opened, you do not own the underlying cryptocurrency, but a contract that you agree to buy or sell a specific cryptocurrency at some point in the future.For example: If you buy BTC with USDT in the spot market, the BTC you buy will be displayed in the asset list in your account, which means that you already own and hold the BTC;
In the contract market, if you open a long BTC position with USDT, the BTC you buy will not be displayed in your Futures account, it only displays the position which means you have the right to sell the BTC in the future to get profit or loss.
Overall, perpetual futures contracts can be a useful tool for traders looking to gain exposure to the cryptocurrency markets, but they also come with significant risks and should be used with caution.
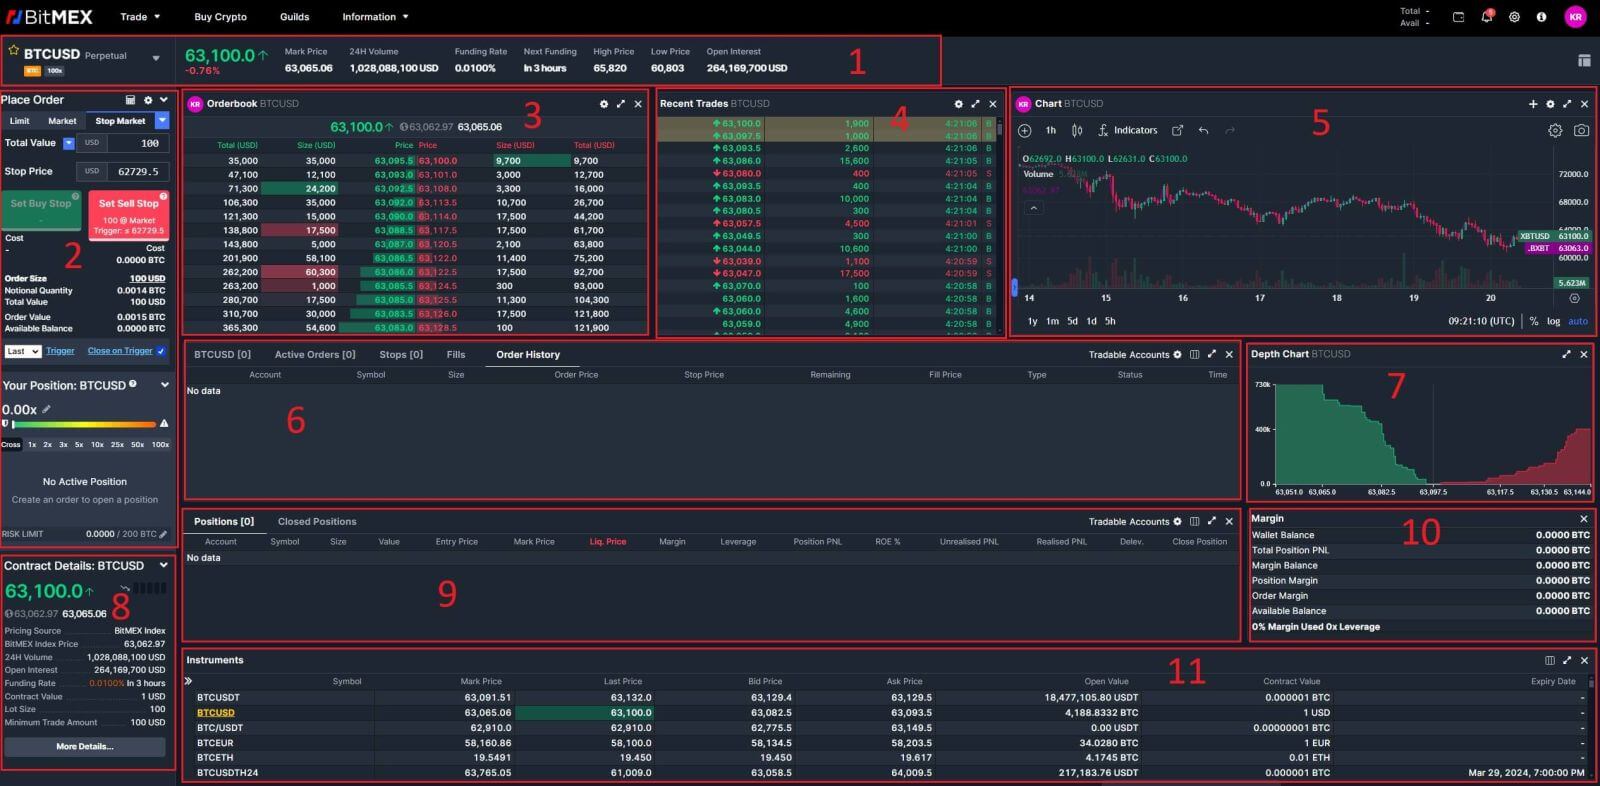
- Trading pair data area: Click “Perpetual” at the left corner on the Futures trading page, and you can select the trading pair according to your personal needs (default is BTC/USDT)
- Order area: This is an area for placing orders and supports the following operations:
- Use different order modes to open positions and place orders (market/limit/trigger)
- Take profit and stop loss settings
- Contract calculator
- Search and use of Futures Bonus
- Preference, position mode, leverage settings
- Order book: View the current order book
- Recent trades: You can view the transaction data of the current trading pair, as well as the real-time funding and the countdown.
- Chart/ depth data area: View the K-line chart of the current trading pair, you can select the time unit as needed, and add indicator items
- Order history: Record of closed positions in the past (displayed by selecting position mode or order mode)
- Depth data area: View the Depth chart of the current trading pair, you can select the time unit as needed, and add indicator items
- Contract Details: Trading pairs details recently.
- Position and order details area: Here you can monitor personal trading activities and conduct operations such as closing
- Margin list: You can view the current situation of the Futures account, margin usage, total profit and loss, and contract assets here.
- Instruments: In the instrument section, you can view the basic data information of the current trading pairs.
How to Trade BTC/USDT Perpetual Futures on BitMEX (Web)
1. Open the BitMEX website.
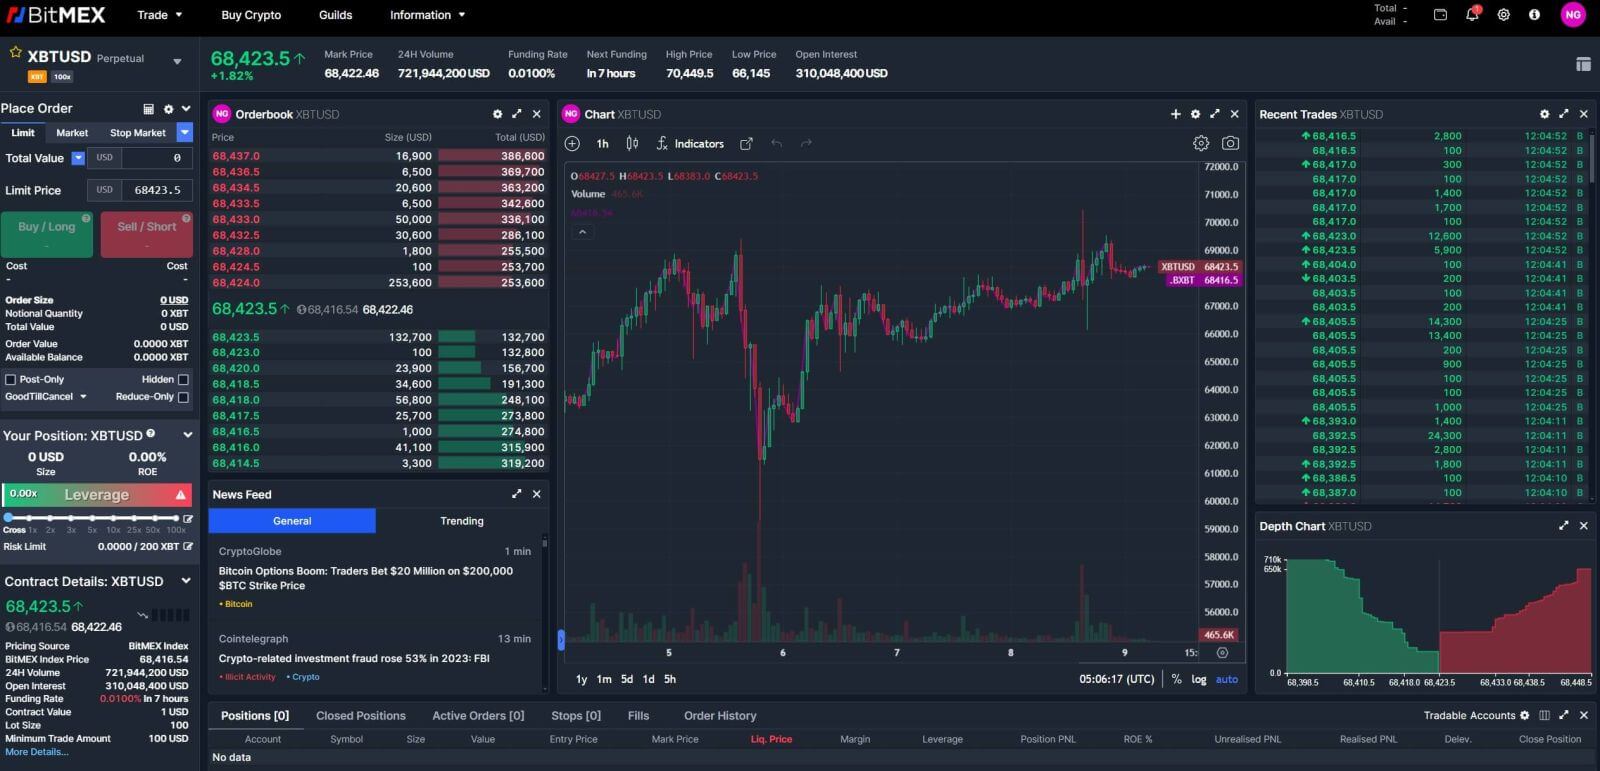
2. Click on [Trade] and choose [Perpetuals] to continue.
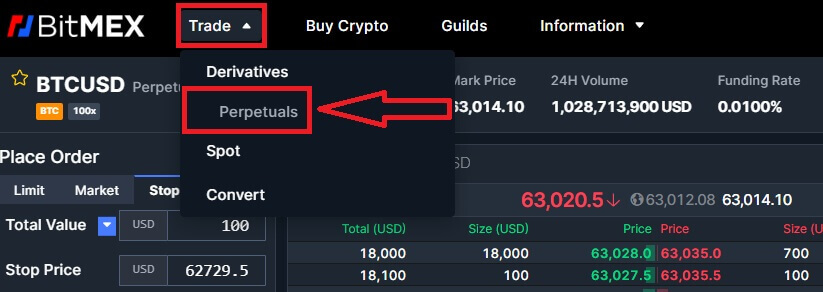
3. Click on the Trading pairs, and a list of trading pairs available will come up for you to choose below.
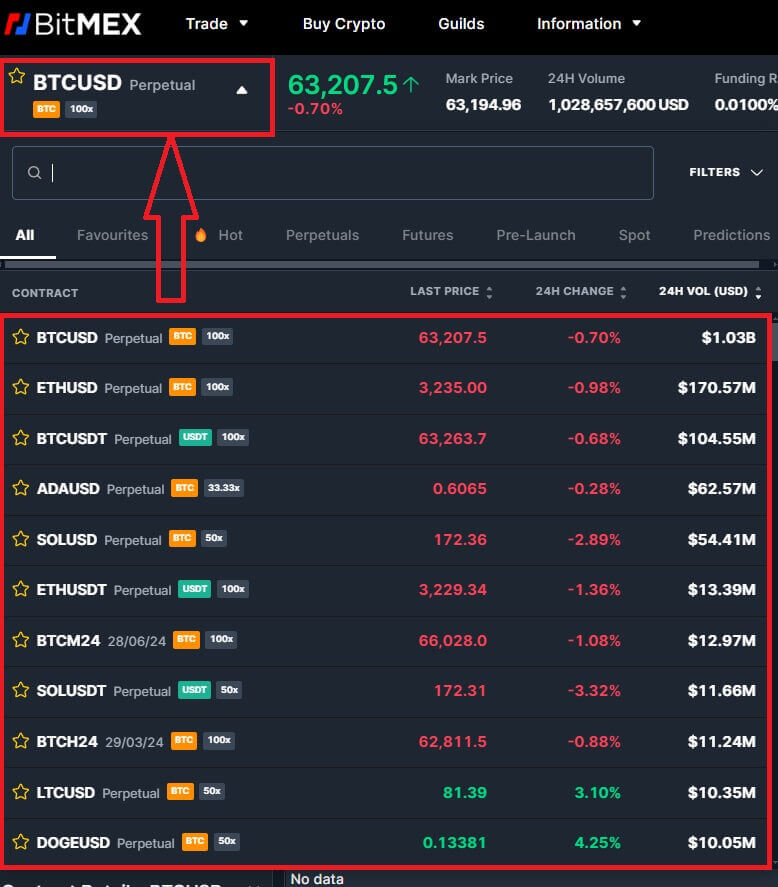
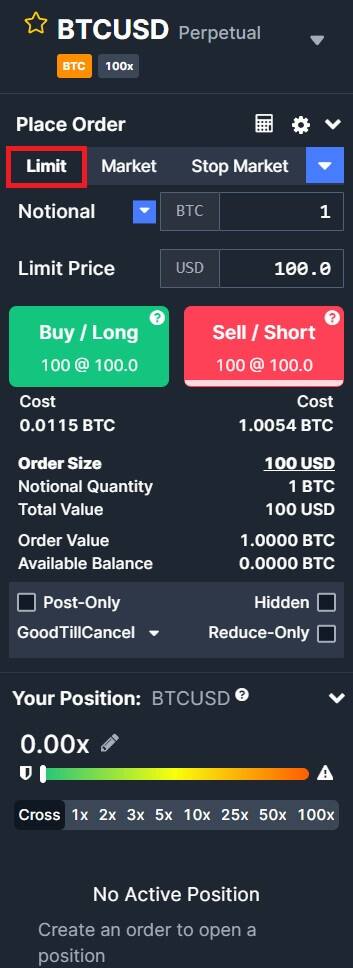
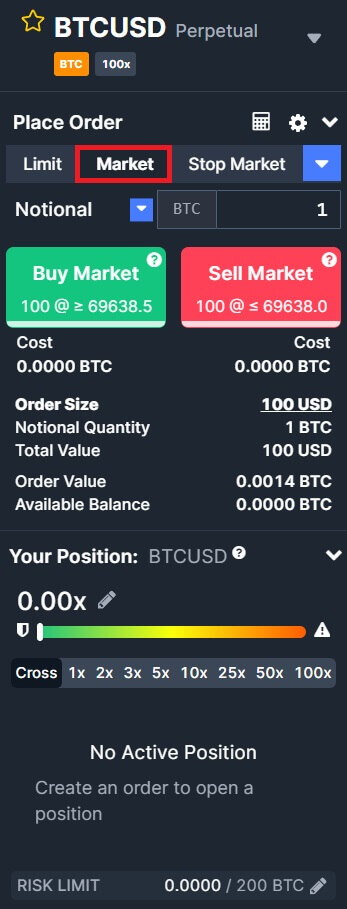
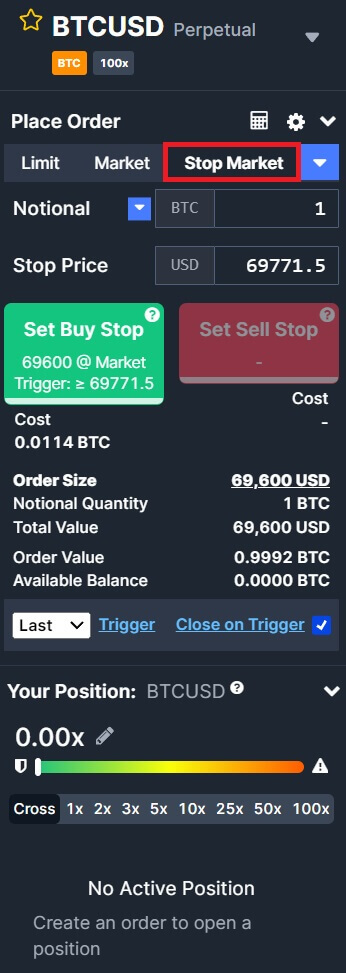
4. To open a position, users can choose between three options: Limit Order, Market price, and Stop Market. Enter the limit price and Total Value select the leverage below and click Open.
- Limit Order: A limit order is an order placed in the order book at a specific limit price. After placing a limit order, when the market price reaches the set limit price, the order will be matched to trade. Therefore, a limit order can be used to buy at a lower price or to sell at a higher price than the current market price. Please note: When the limit order is placed, the system does not accept buying at high prices and selling at low prices. If you buy at high prices and sell at low prices, the transaction will be executed immediately at the market price.
- Market Price: A market order is an order that trades at the current best price. It is executed against the previously placed limit order in the order book. When placing a market order, you will be charged a taker fee for it.
- Stop Market Order: The trigger order sets a trigger price, and when the latest price reaches the trigger price set before, the order will be triggered to enter the order book.
5. After choosing the order type, adjust your leverage for the transaction.
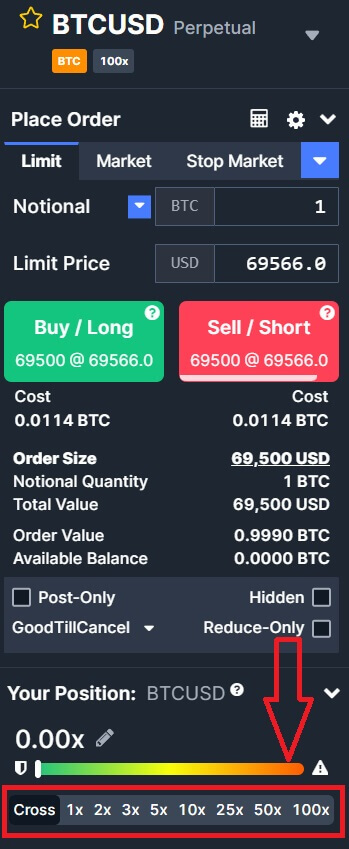
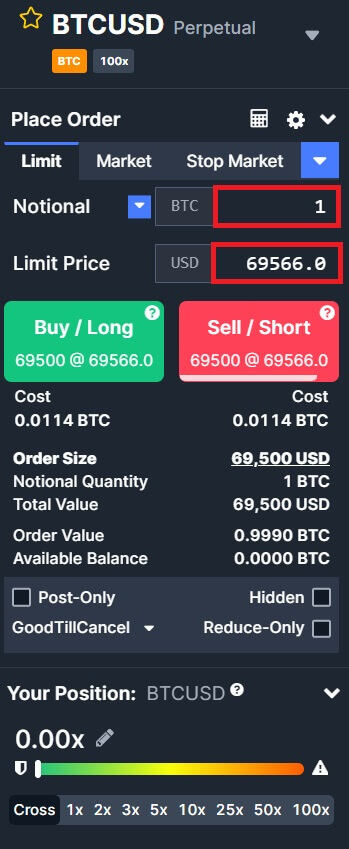
6. Type in the Notional/Amount and the limit price (Limit order) of the coin that you want to do the order. In this example, I want to order 1 BTC for the 69566.0 USD limit price.
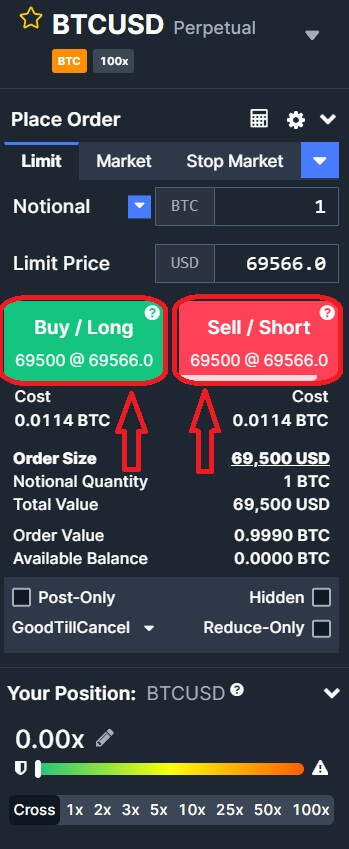
7. Then click on Buy/Long or Sell/Short that you want to do with your order.
8. After placing your order, view it under [Open Orders] at the bottom of the page. You can cancel orders before they’re filled. Once filled, find them under [Position].
9. To close your position, click [Close] under the Operation column.
How to Trade BTC/USDT Perpetual Futures on BitMEX (App)
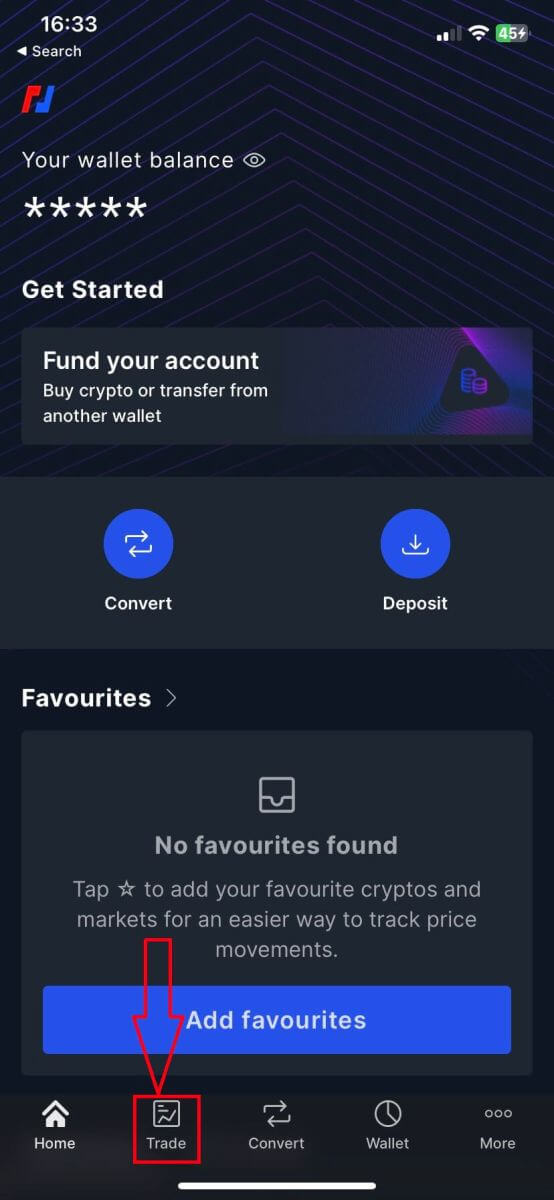
1. Open the BitMEX app on your phone.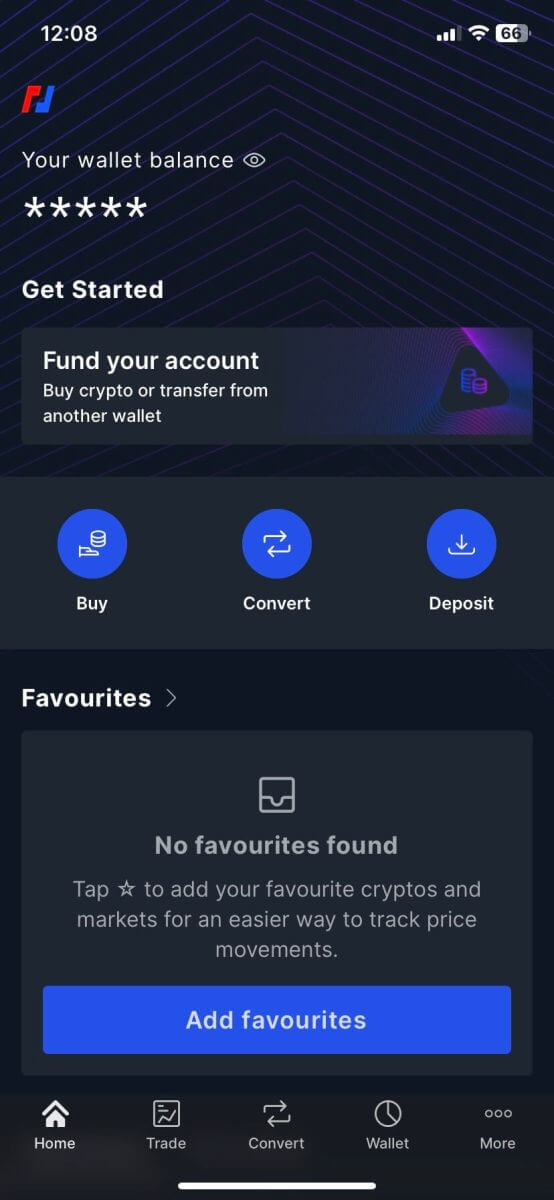
2. Click on [Trade] to continue.
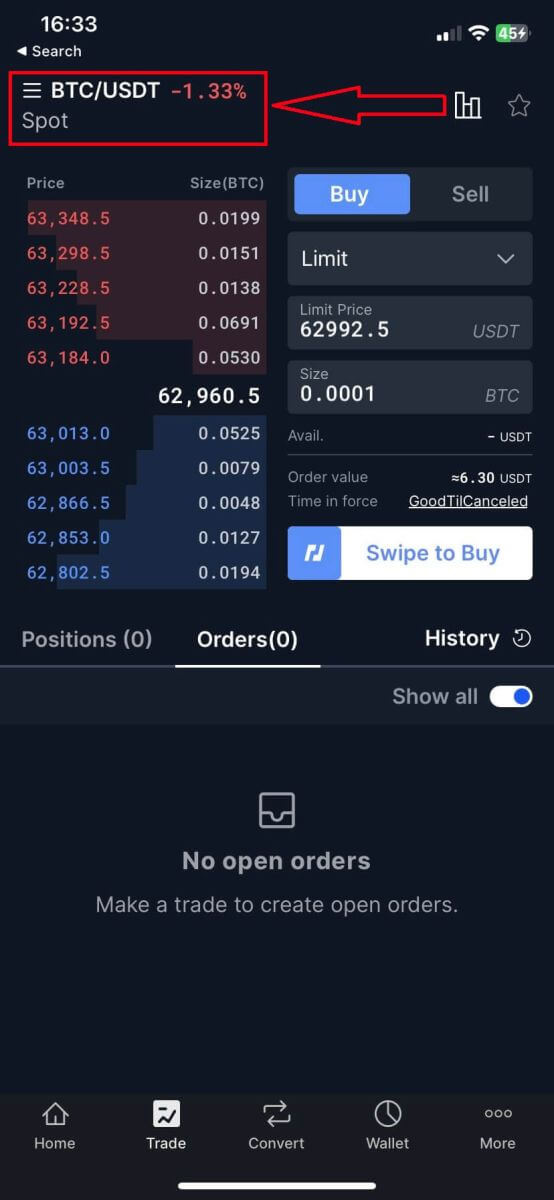
3. Clicking on the default BTC/USDT pairs.
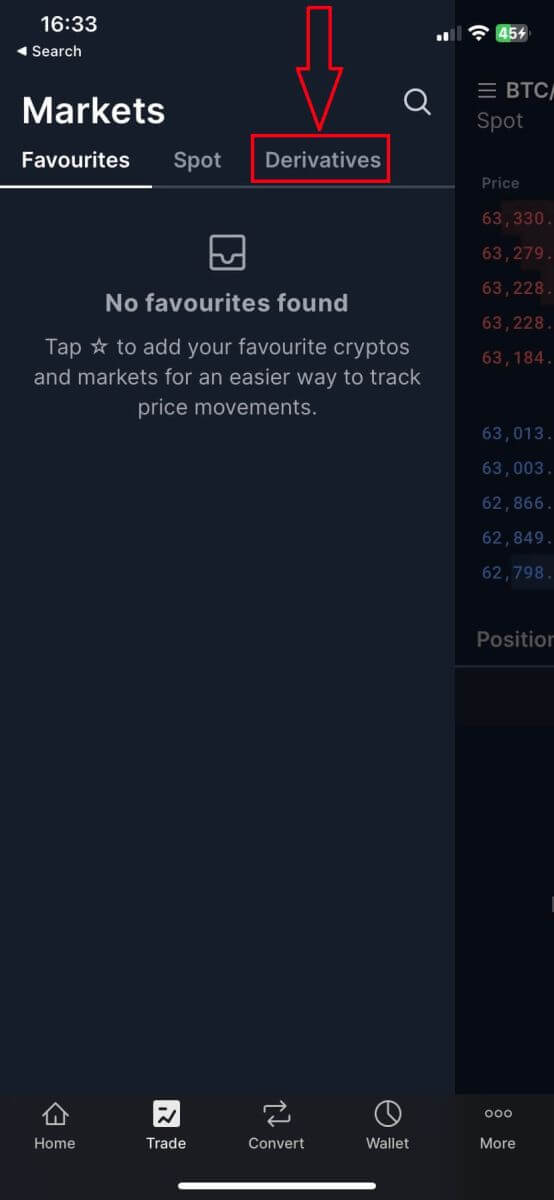
4. Choose [Derivatives] for future trading.
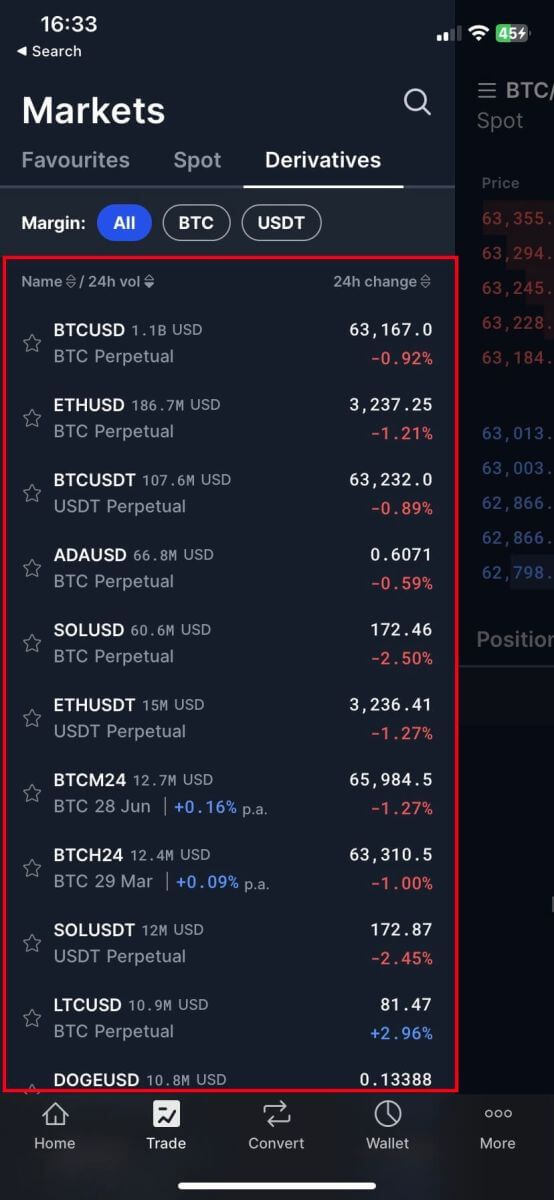
5. Choose the trading pairs that you want to select.
6. Here is the main page of Futures Trading.
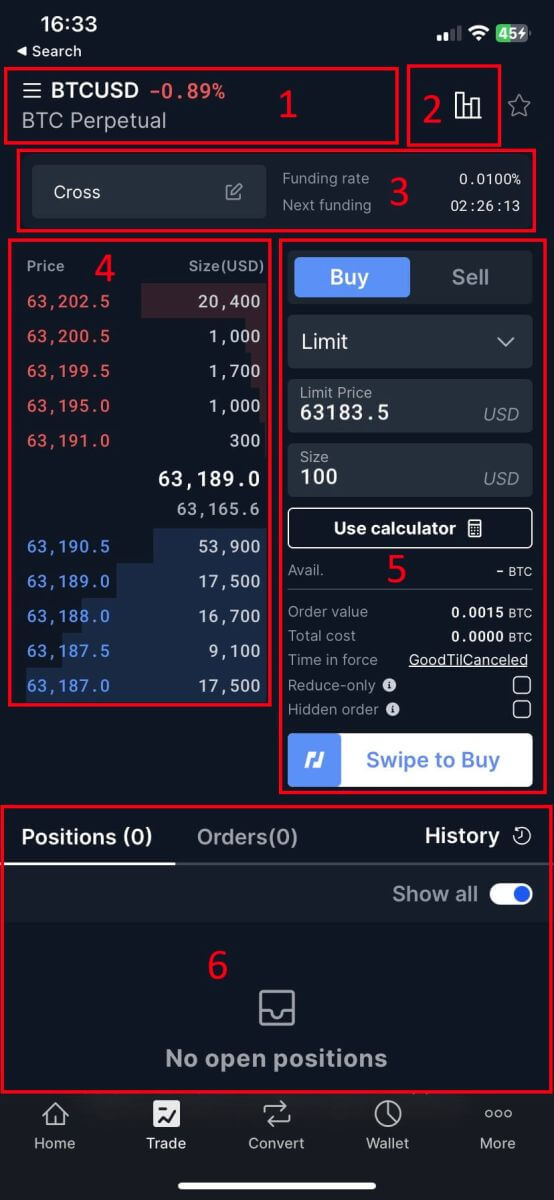
- Trading pair data area: Shows the current contract underlying cryptos with the current increase/decrease rate. Users can click here to switch to other varieties.
- Charts: View the K-line chart of the current trading pair, you can select the time unit as needed, and add indicator items
- Margin mode: Allow users to adjust the margin mode of the orders.
- Order book, Transaction Data: Display current order book and real-time transaction order information.
- Operation panel: Allow users to make fund transfers and place orders.
- Position and order details area: Here you can monitor personal trading activities and conduct operations such as closing.
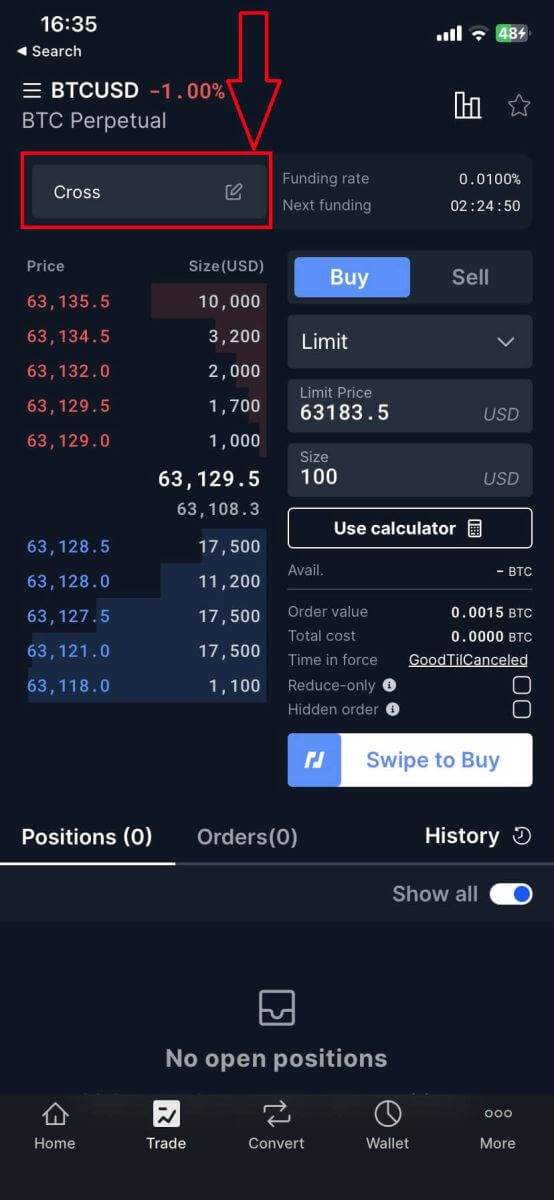
8. Choose cross if you want to and set the risk limit then click on [Save].
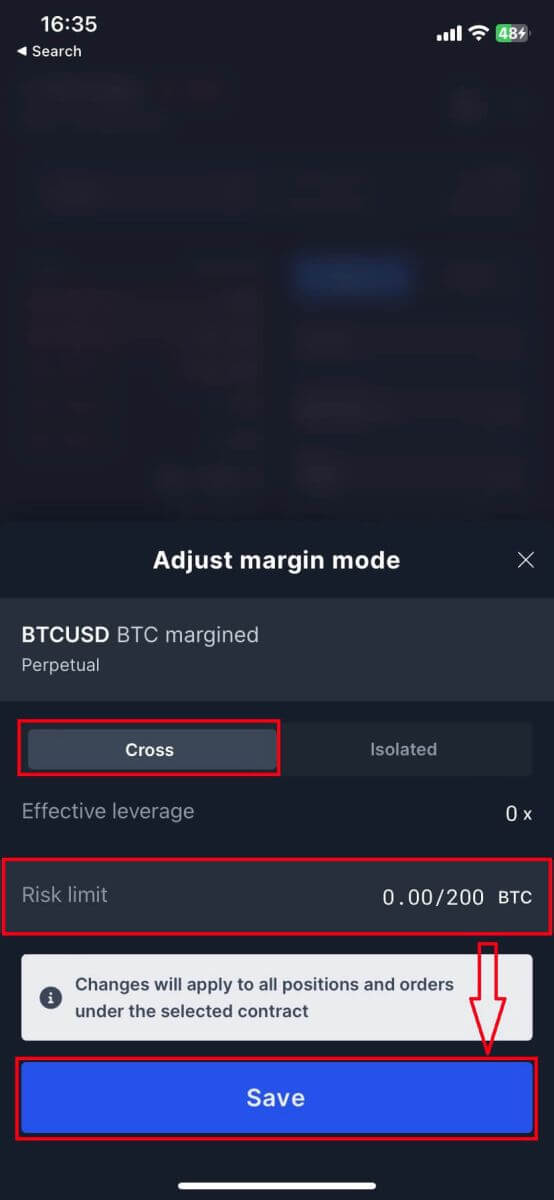
9. Same as the cross, in Isolated adjust the leverage then click on [Save].
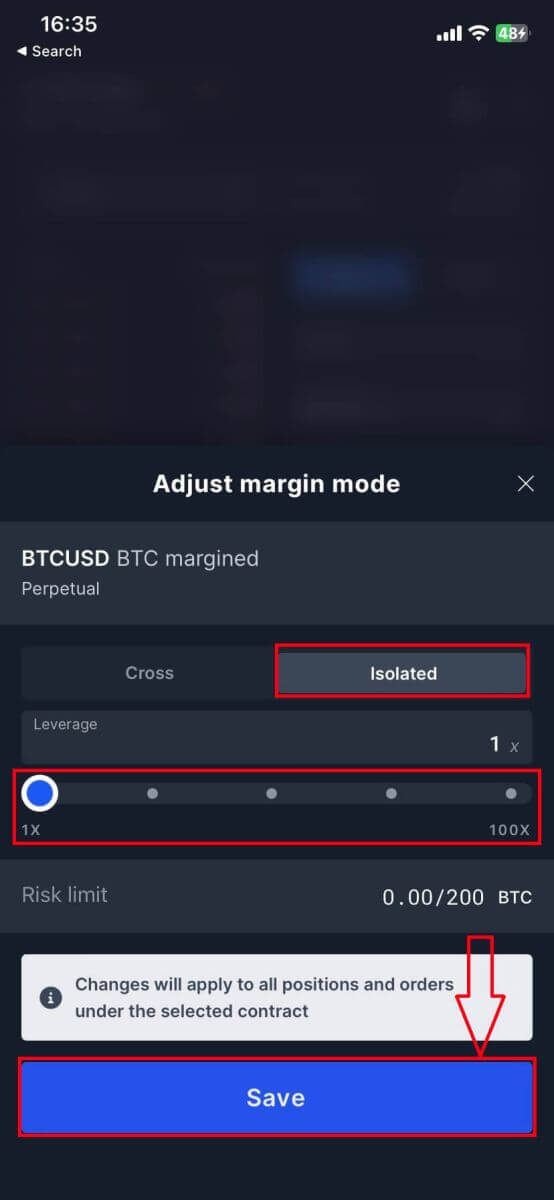
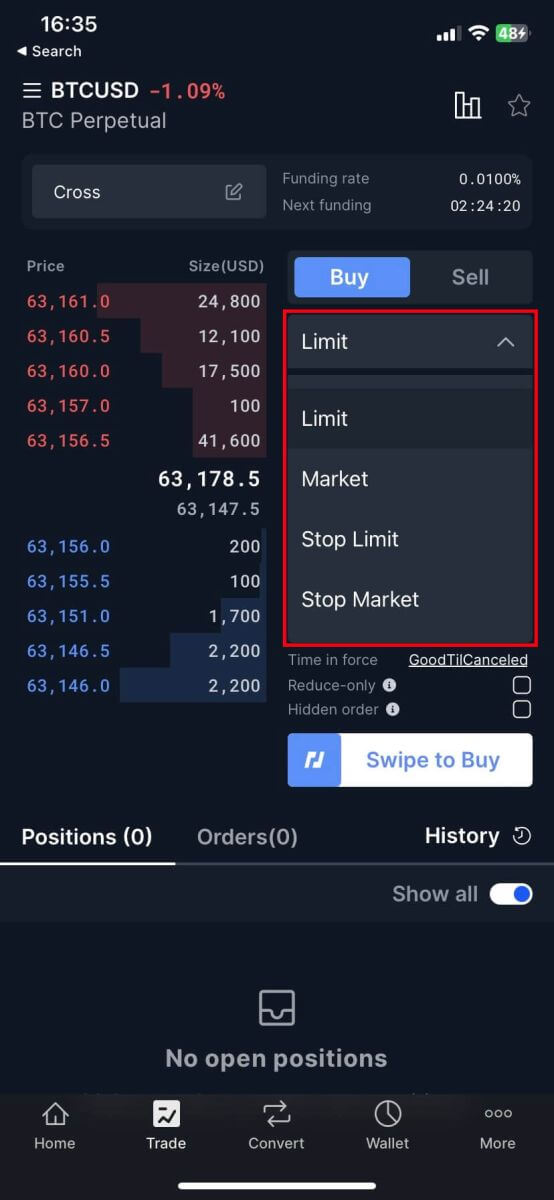
10. Choose the Types of trade by clicking on [Limit] to extend options.
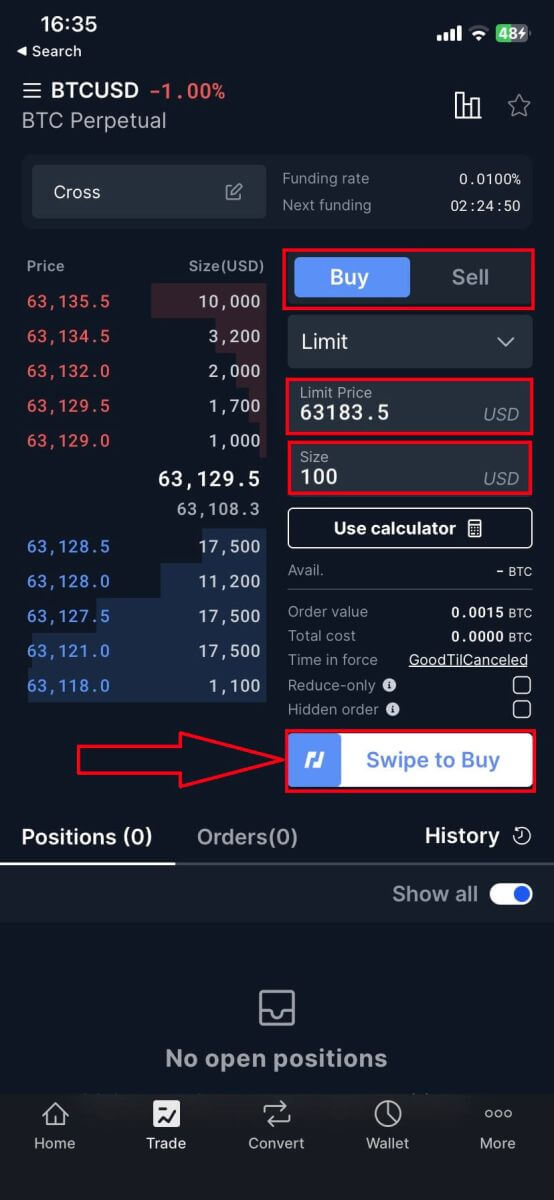
15. Enter the limit price and amount, for a market order, input only the amount. Swipe [Swipe to Buy] to initiate a long position or [Swipe to Sell] for a short position.
11. Once the order is placed, if it isn’t filled immediately, it will appear in [Open Orders]. Users have the option to tap [Cancel] to revoke pending orders. Fulfilled orders will be located under [Positions].
12. Under [Positions] tap [Close] then enter the price and amount required to close a position.
Frequently Asked Questions (FAQ)
Does Leverage affect my PNL?
Leverage does not directly affect your Profit and Loss (PNL). Instead, it comes into play when determining the amount of margin allocated to your position; higher leverage requires less margin, allowing you to open larger positions with a smaller backing. So, while leverage itself does not affect your PNL, it can impact your position size, which in turn can influence PNL.
What actually affects my PNL?
Aside from position size, PNL is affected by the difference between your Average Entry Price and Exit Price, Trading Fees, and Multiplier.
The calculation for it is the following:
Unrealised PNL = Number of Contracts * Multiplier * (1/Average Entry Price - 1/Exit Price)
Realised PNL = Unrealised PNL - taker fee + maker rebate -/+ funding payment
Why did I realize a loss in a profitable position? (Instant PNL Realisation)
The Basics of Instant PNL Realisation
When you enter a position, you have a certain Average Entry Price (avgEntryPrice) and the same Average Cost Price (avgCostPrice).
If your position is on Cross Margin and it has Unrealised Profit, the Instant PNL Realisation system will automatically realize that PNL for you. When it does this, you’ll receive the Realised PNL in your wallet and your Average Entry Price gets updated to the current Mark Price. Your Average Cost Price, however, will still reflect the original Entry Price when you opened your position.
Our system will use the updated Average Entry Price to calculate your Unrealised PNL going forward. At this point, if the price moves in a direction that is adverse to your updated Average Entry Price, you will see that you have an Unrealised Loss on the position. If you close the position then, you will see a realized loss for that trade. However, you only made a loss against the updated Average Entry Price. As long as you closed in profit against your Average Cost Price, you made a profit on the trade (ignoring fees, etc).
Gauging Your Total Realised PNL
To have a comprehensive understanding of your trading performance, it’s essential to track your Realised PNL over the lifetime of your position. By looking at the history of Realised PNL transactions since you opened your position, you can see the cumulative PNL realized through Instant PNL Realisation.
If you have been in a profitable position, you were realizing profits over time, and any loss that you see on a particular day is just a portion of the total Realised PNL.
How do I change my leverage?
You can set and adjust your leverage using the leverage slider in the Your Position widget on the left side of the Trade page.By default, it will be set to Cross, however, once you change it, it will remain on what you’ve set until you exit your position. Once your position is closed, it will automatically revert back to Cross shortly after.
What happens when I change my leverage?
Changing your leverage here will instantly update your leverage on your open position. If you increase your leverage, you reduce the amount of margin assigned to your position and that balance goes back to your Available Balance. Equally, if you decrease leverage, you increase the margin assigned to your position and it will be taken from your Available Balance.
What’s the difference between Cross and Isolated Margin?
To learn about the difference between Cross and Isolated Margin (1x-100x), please have a look at our Isolated and Cross Margin guide.
How is Cross Margin allocated to the position?
When you use Cross Margin, your total balance is considered as collateral for your position. However, only a portion of your balance is actually locked up as a margin, and the remaining balance is still available for other purposes, such as withdrawing funds or entering new trades.
Once the initial margin is set, the system will allocate additional margin in batches equivalent to the unrealized loss each time the maintenance margin requirement is breached. Conversely, if the position is profitable, the system will release the margin from the position.
Position margin can also be changed by:
- Manually adding or removing margin
- Funding going into and out of position margin
- Automatic system margin allocation
What is Leverage and why use it?
When you trade with leverage, you can open positions that are much larger than your actual account balance. BitMEX offers up to 100x leverage on some of its products. This means that you can buy as much as 100 Bitcoin of contracts with only 1 Bitcoin to back it.
The amount of leverage you can access depends on the initial margin (the amount of XBT you must have in your available balance to open a position), the maintenance margin (the amount of XBT you must hold in your account to keep a position open) and the contract you’re trading.
What is the difference between Isolated Margin and Cross Margin in the event of a liquidation?
Isolated Margin
If you are using an Isolated Margin, the margin assigned to a position is restricted to the amount assigned to the position. For example, if you assign $100 to a position in an Isolated Margin, $100 is the maximum amount you could lose if you were liquidated.
Cross Margin
Cross Margin, also known as “Spread Margin”, is a margin method that utilizes the full amount of funds in the Available Balance to avoid liquidations - Any realized PNL from other positions can also aid in providing margin to a losing position. Therefore, when using Cross Margin, all your funds in your Available Balance will be lost if your position is liquidated.


